Chapter 3 - Installing on Azure
This chapter is a step-by-step walkthrough for installing DBXL v3.6 on Windows Azure. It covers creating the virtual machine and attaching a data disk, connecting to it with Remote Desktop, preparing the server (IE Enhanced Security, data volume, IIS and .NET Framework 3.5, SQL Server Express 2014), running the DBXL installer, and configuring and testing the QueryDBWithUserKey service with a user key. A troubleshooting script for missing IIS and ASP.NET features closes the chapter.
Note: If you are upgrading from a previous version of DBXL, please contact Qdabra support.
3.1 Adding a Virtual Machine on Microsoft Azure
- Log in to your Microsoft Azure site.
- Create a new Virtual Machine instance by clicking the New button.
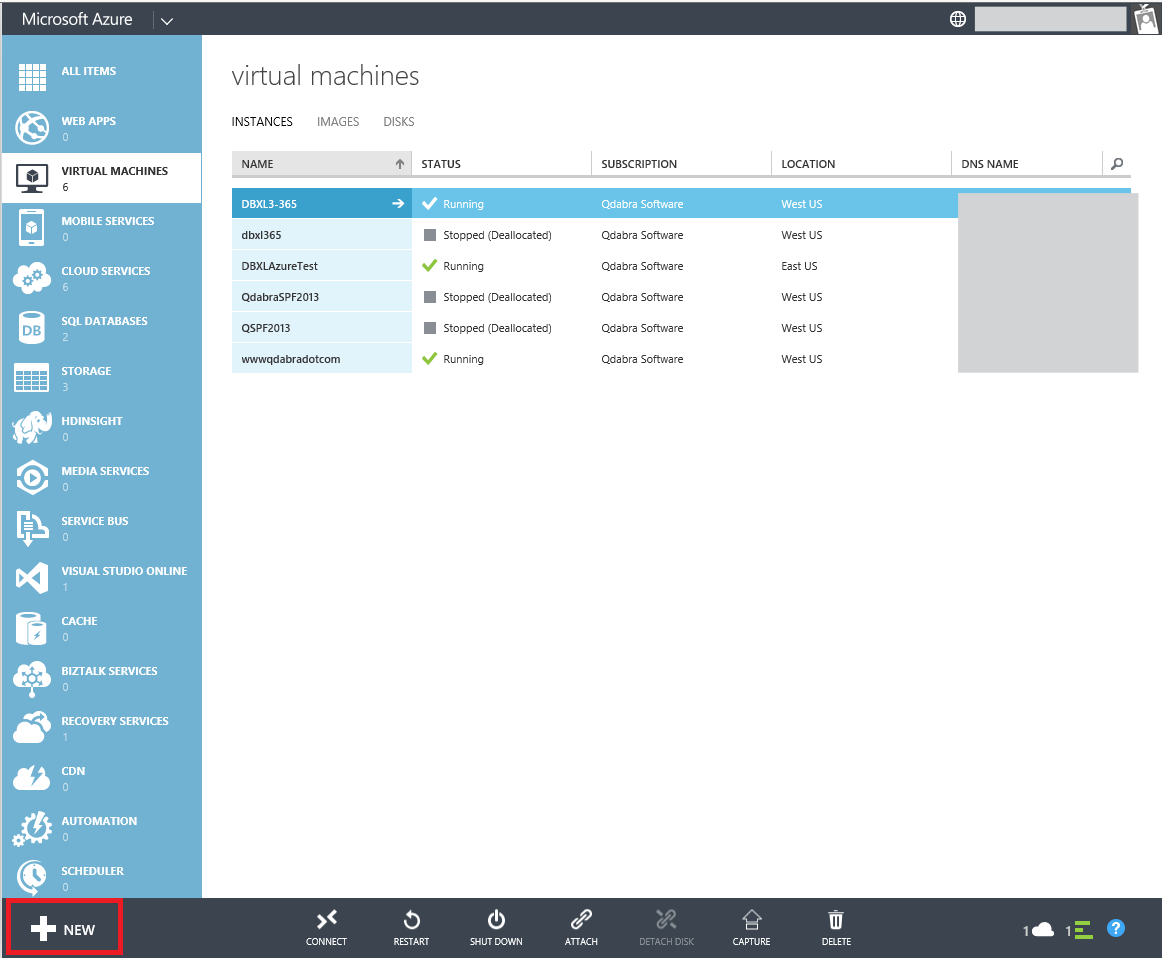
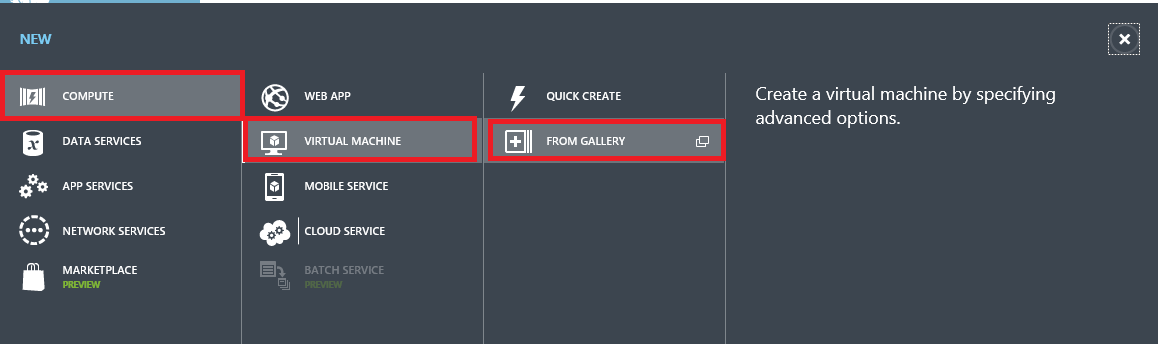
- A new window pops up. Select Compute > Virtual Machine > From Gallery.
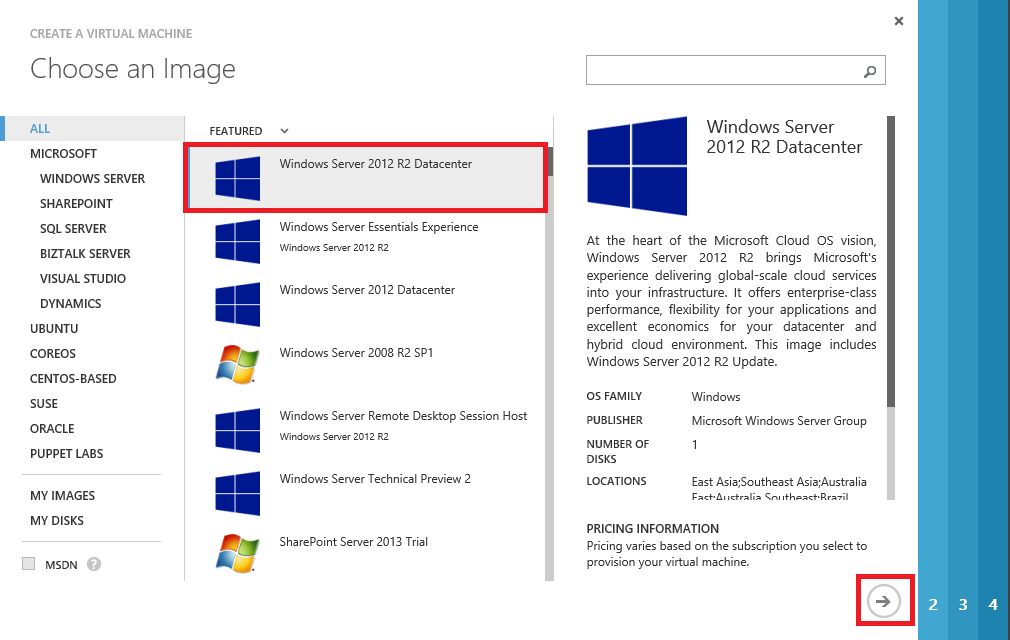
- On the next screen, select Windows Server 2012 R2 Datacenter and click the right-arrow (→) sign.
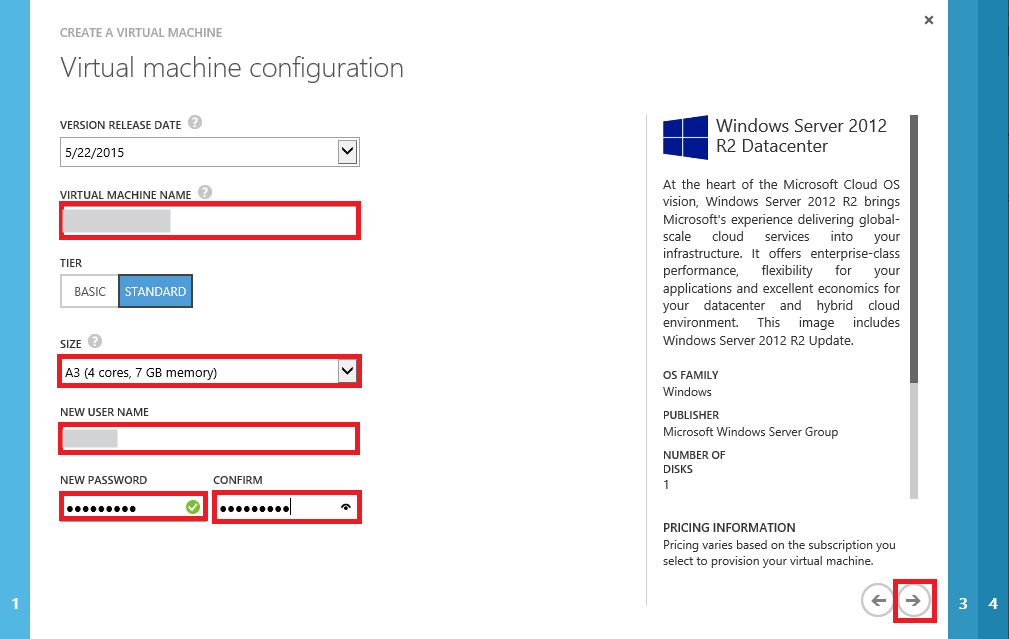
- On the next screen:
- Virtual Machine Name - enter the name for your Virtual Machine
- Tier - Standard
- Size - select A3 from the drop-down
- New User Name - enter the username
- New Password - enter a password and confirm it
- Click the right-arrow (→) sign to go to the next screen.
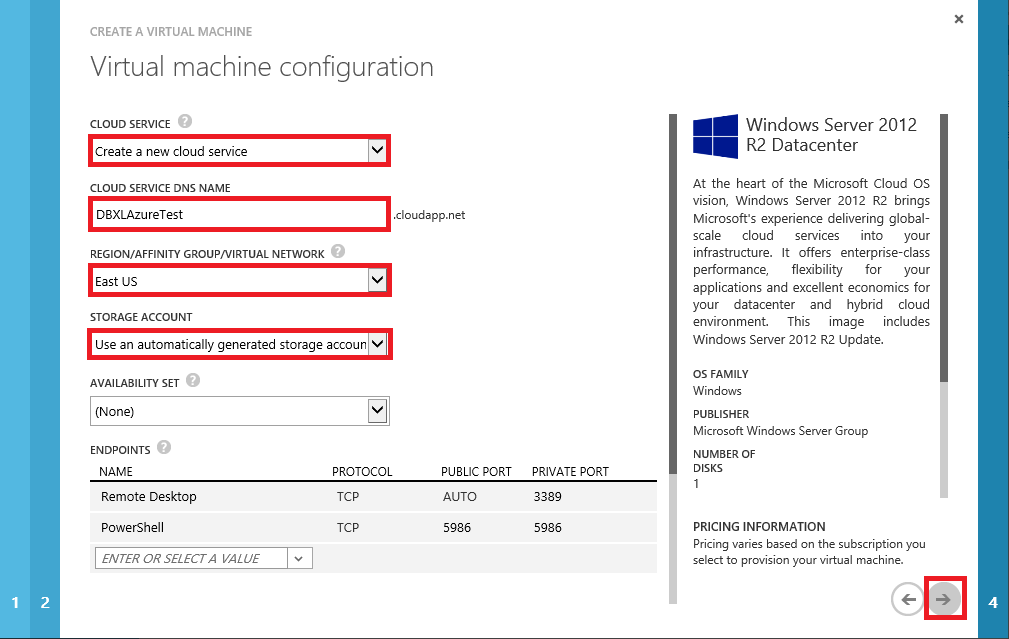
- On the next screen:
- Cloud Service - select "Create a new cloud service"
- Cloud Service DNS Name - give the Virtual Machine name
- Region/Affinity Group/Virtual Network - select a region for your virtual network
- Storage Account - select "Use automatically generated storage account"
- Click the right-arrow (→) sign.
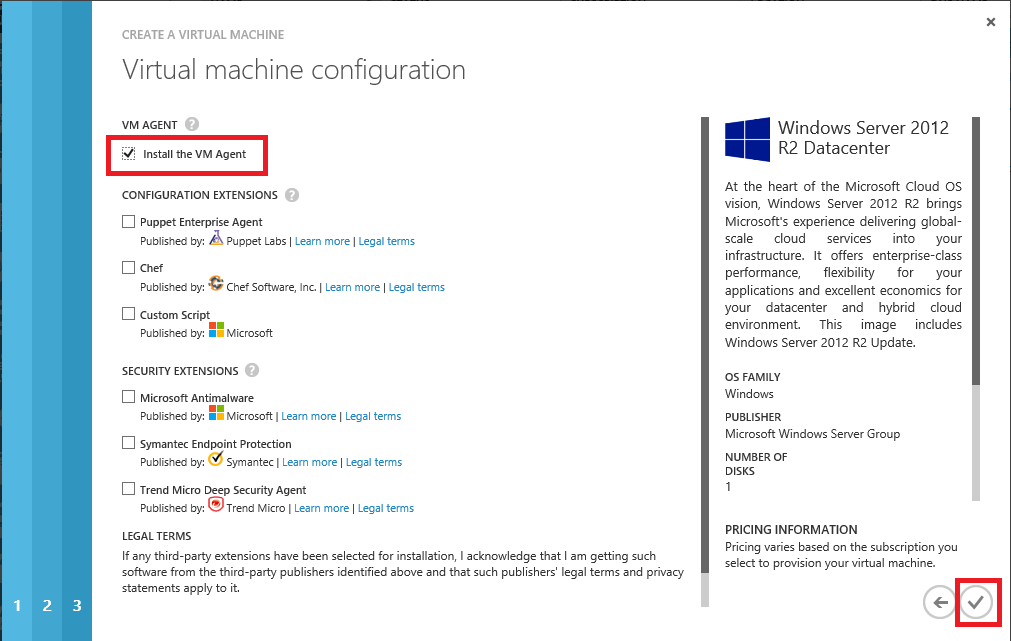
- On the following screen, check the box next to Install the VM Agent and click the tick-mark.
-
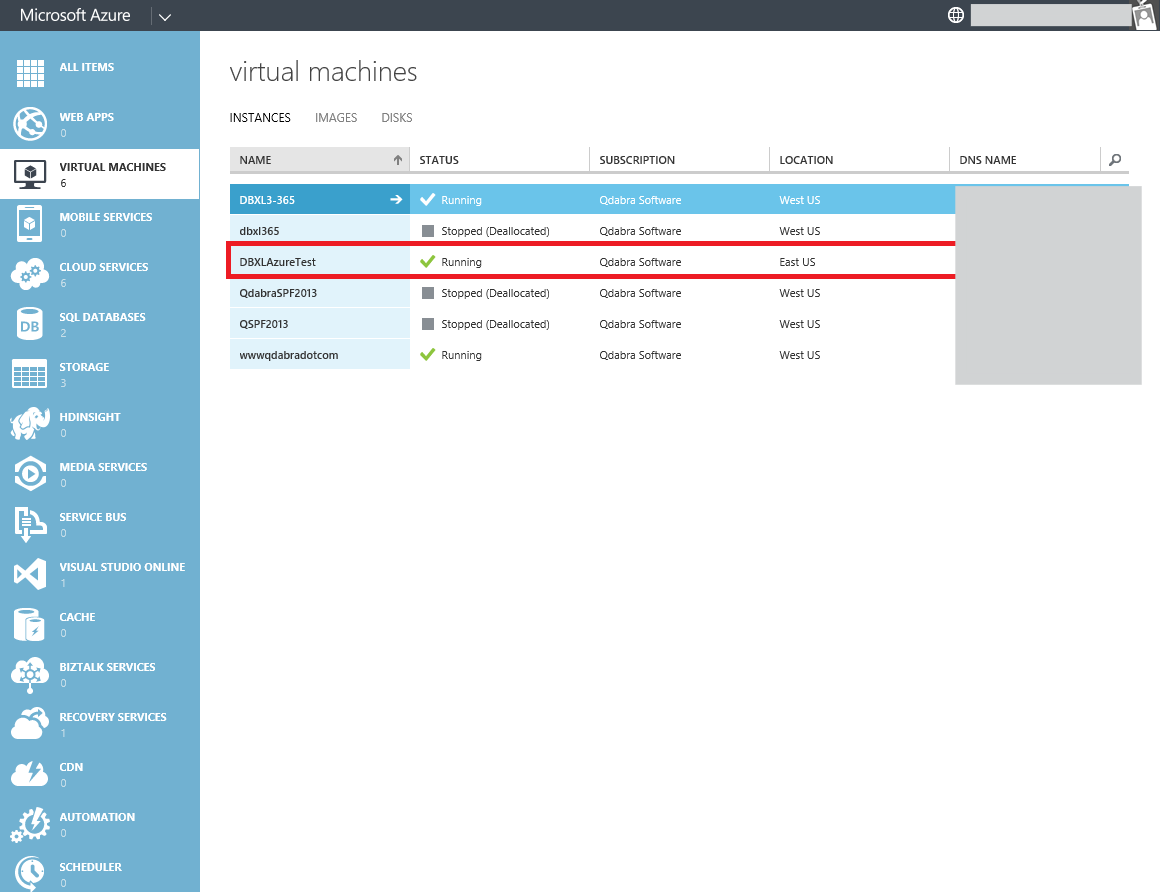
You will find the Virtual Machine instance Starting. After some time its Status changes to Running.
-
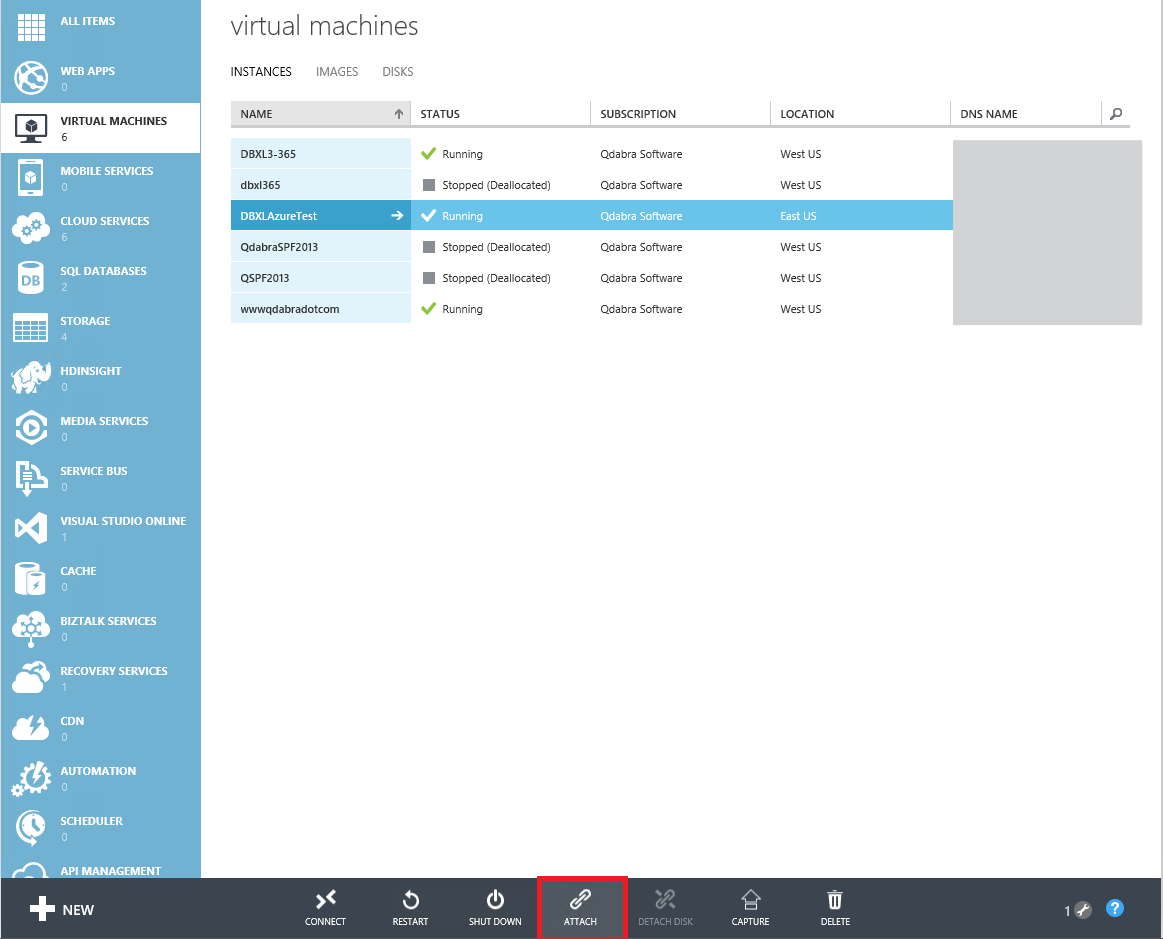
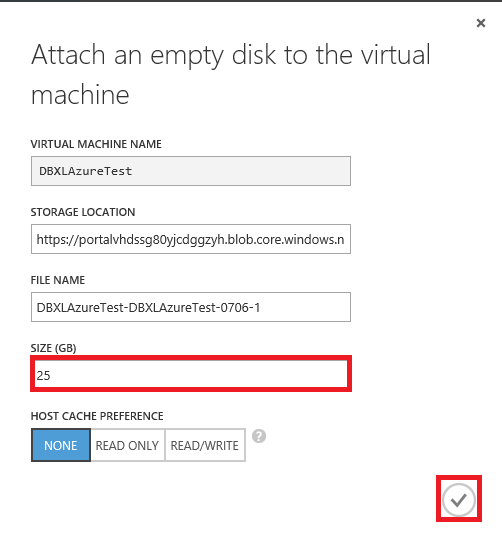
Now select your Virtual Machine and click Attach at the bottom of the screen, to attach an empty disk to your virtual machine.
-
In the dialog box that appears, give the disk Size in GB. Click the tick-mark sign.
-
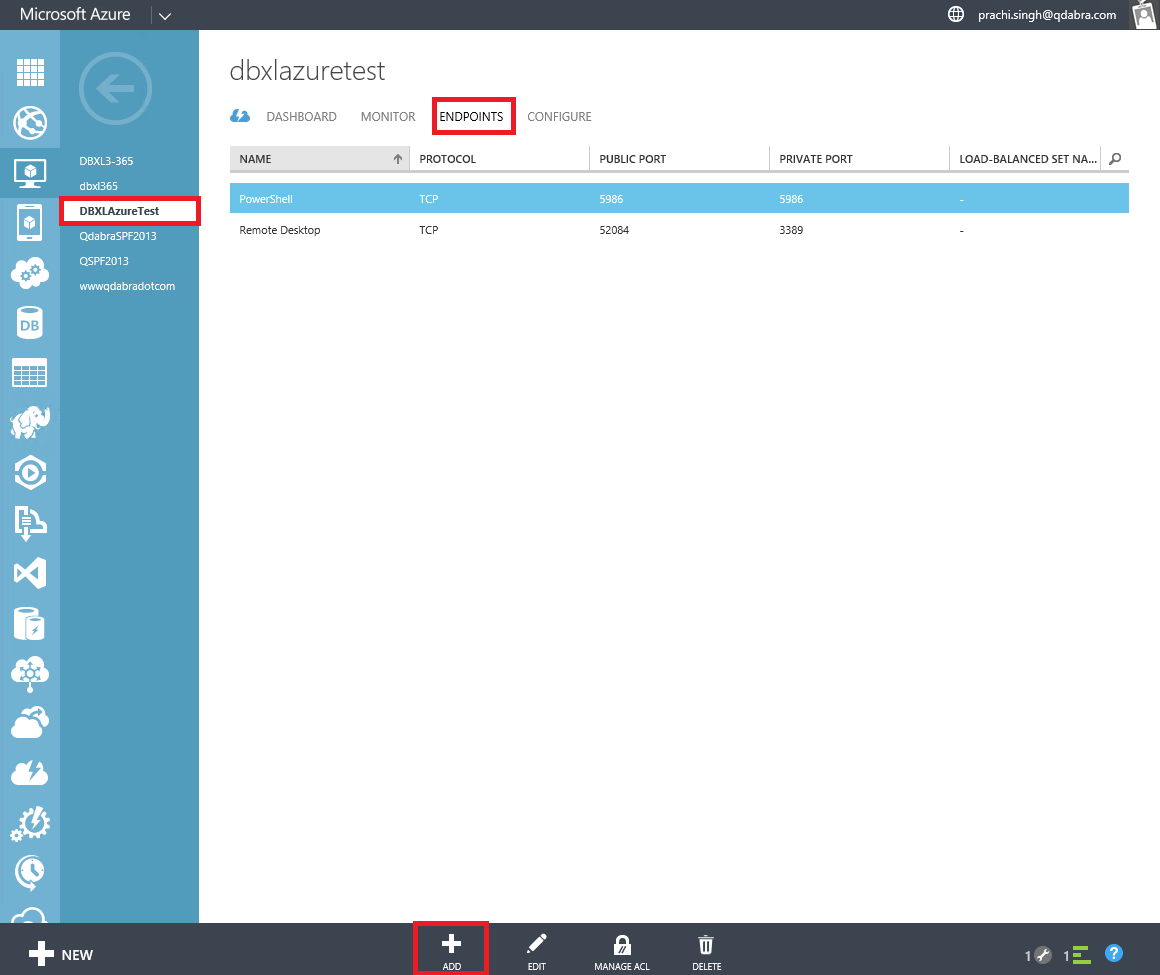
Now we will add the EndPoints. Go to the Dashboard and click the right-arrow.
- Click EndPoints.
-
Click Add at the bottom of the screen.
-
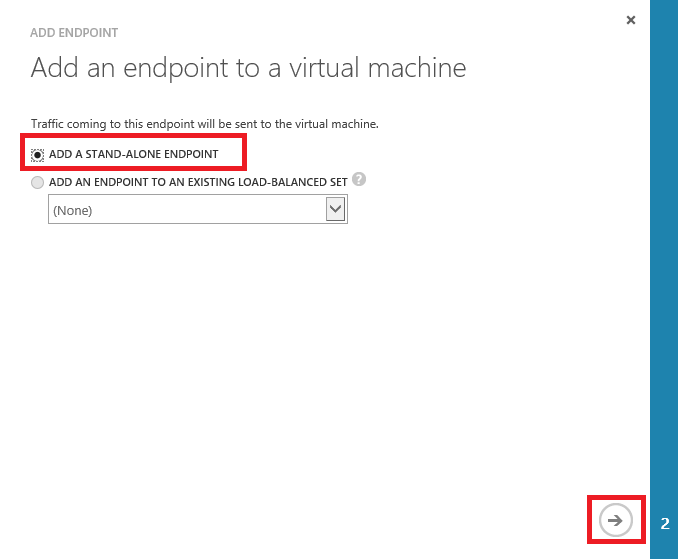
A window pops up to add an endpoint to your virtual machine. Click Add A Stand-alone Endpoint and click the right-arrow (→).
-
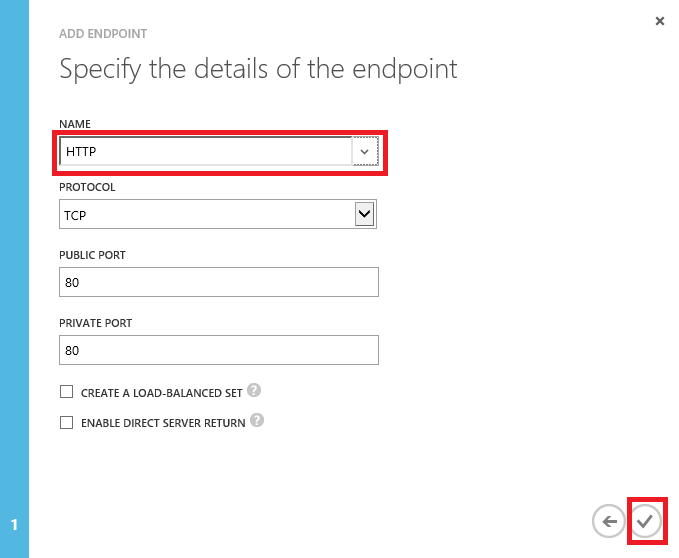
Select HTTP for the Endpoint name and click the tick-mark.
3.2 Remote Desktop Connection to the Virtual Machine
- Once the disk is attached and the status is Running, select the Virtual Machine and click Connect.
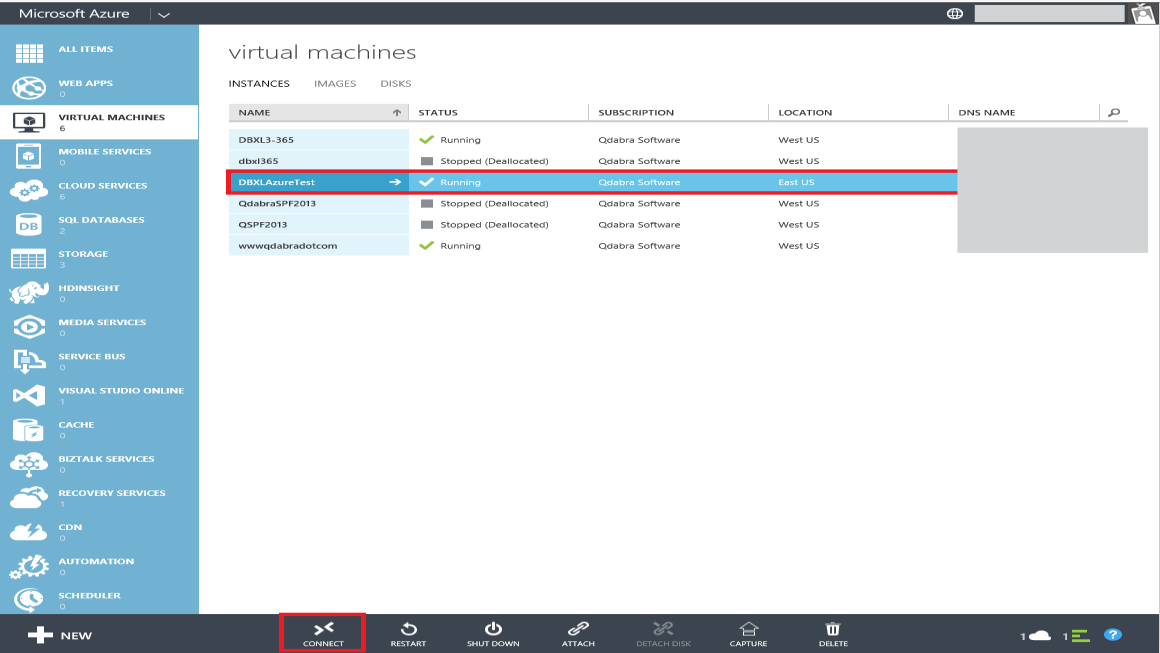
- A dialog box appears at the bottom of the screen asking, "Do you want to open or save
<YourVirtualMachine>.rdp." Click Open. - Click Connect on the following Remote Desktop Connection dialog box, to connect to your Virtual Machine.
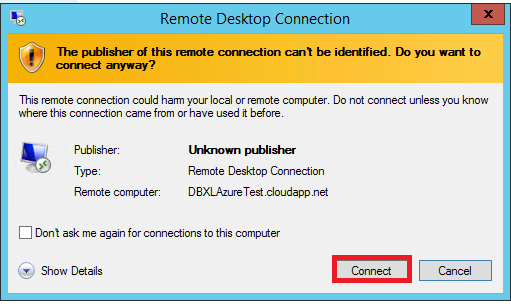
- Enter the credentials (Username and Password) for the Remote Desktop that you entered while configuring this Virtual Machine. Click OK.
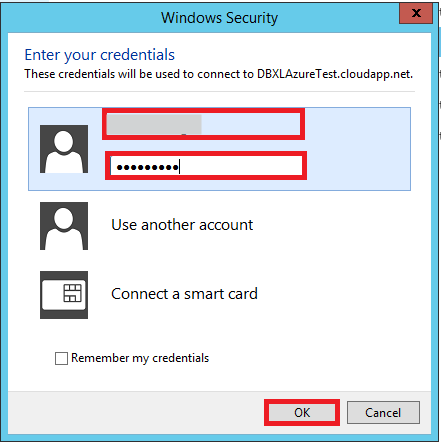
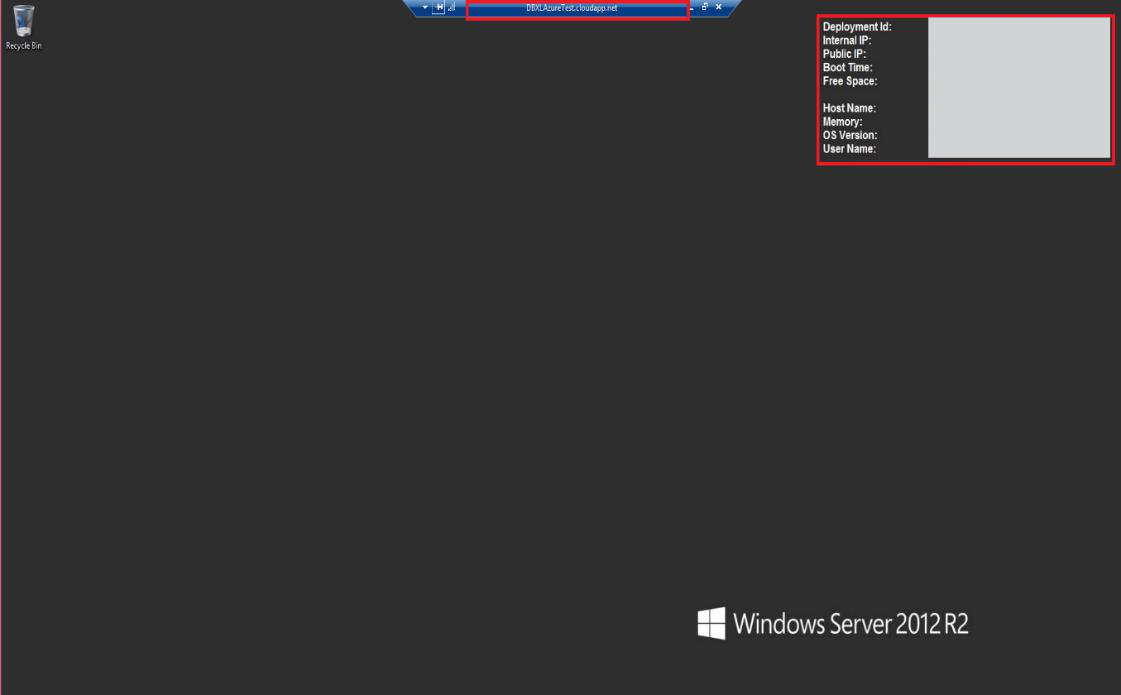
- A remote desktop connection will be established with your Virtual Machine name. More information about the machine (IP, free space, memory etc.) is displayed at the top right corner.
3.2.1 Configure Server Manager
- Once the site has been added to your Trusted Sites, open the Server Manager on the Virtual Machine.
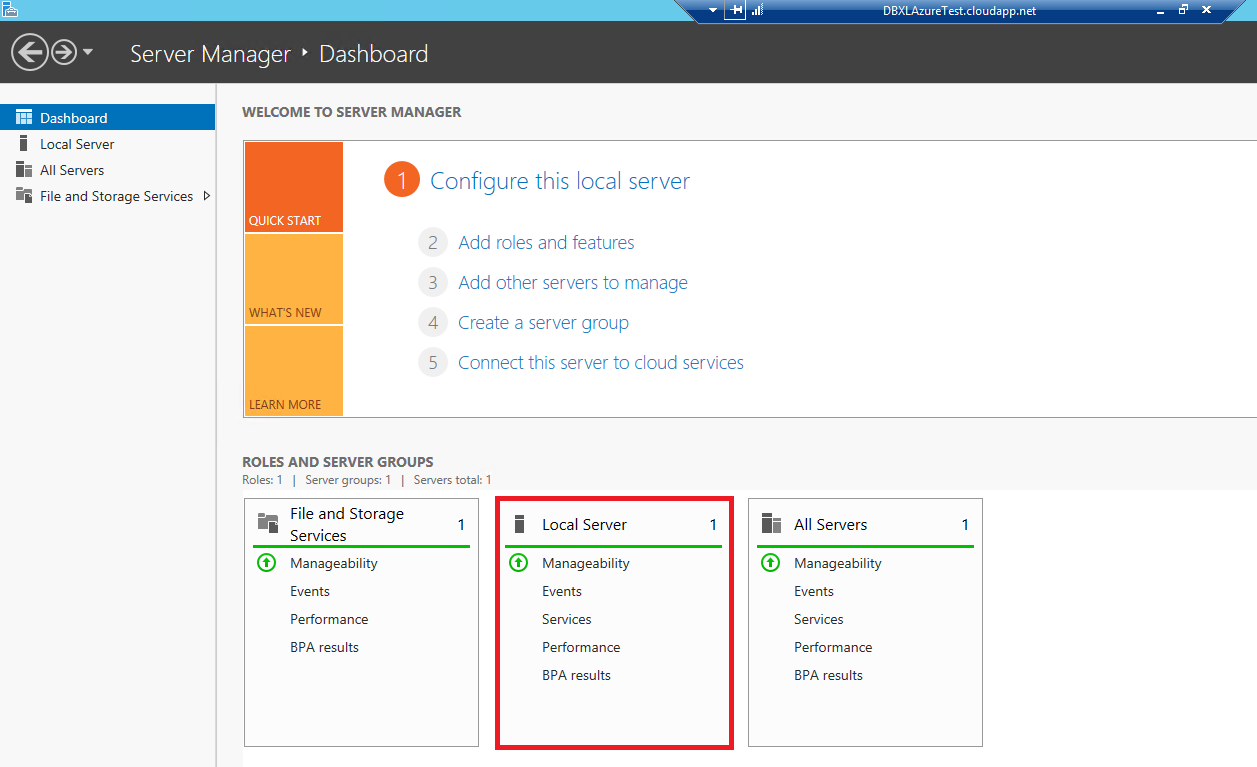
- Click Local Server.
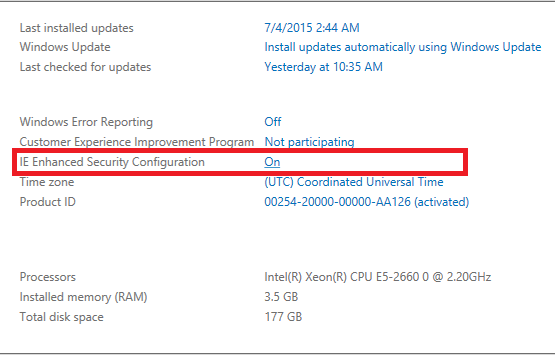
- On the right side of the screen, search for IE Enhanced Security Configuration. Click On.
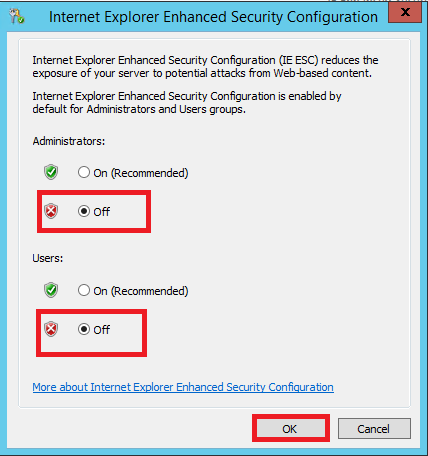
- Turn off both the Administrator and User, for IE enhanced security. Click OK.
- Refresh the page. The IE Enhanced Security Configuration should now show as Off.
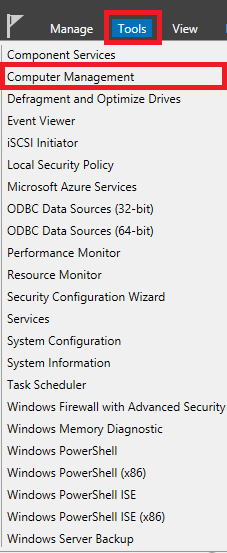
- Now click Tools at the top-right corner of the Server Manager and select Computer Management.
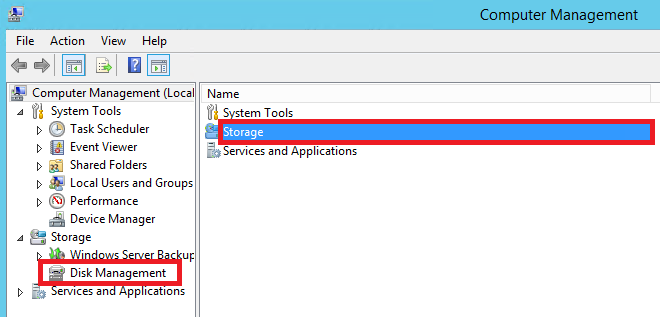
- In the Computer Management window, select Storage and click Disk Management under it.
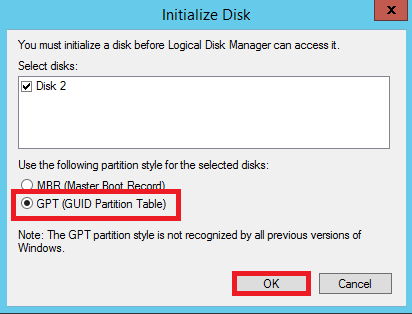
- A dialog box pops up to initialize the disk. Select GPT (GUID Partition Table) and click OK.
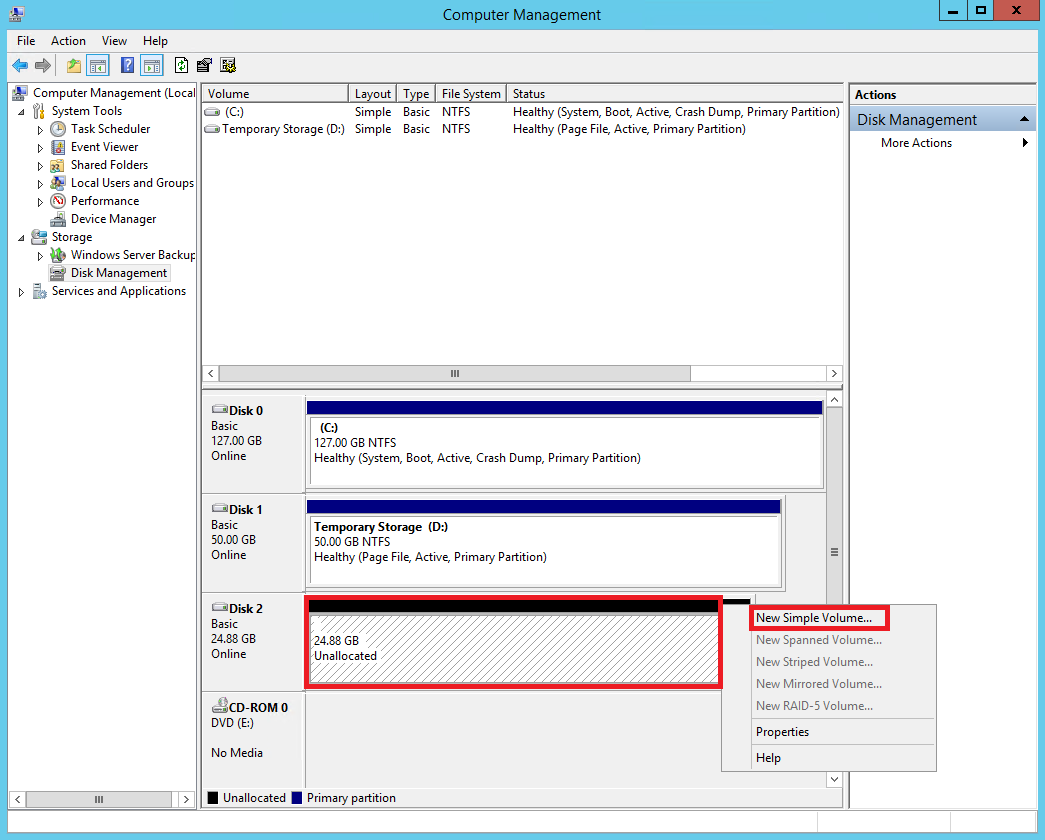
- In the Disk Management window, scroll down to Disk 2. Right-click it and select New Simple Volume.
-
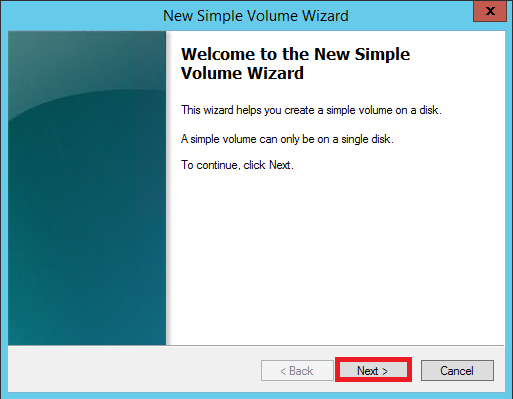
Click Next when the New Simple Volume wizard appears.
-
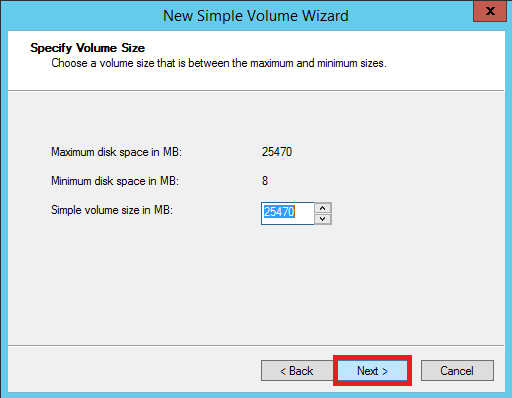
Let the Simple Volume size be the default value. Click Next.
-
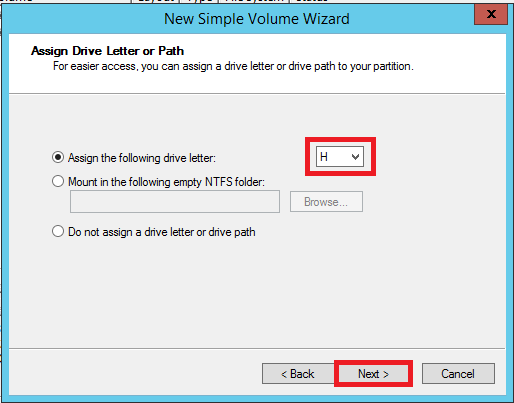
In the next window, assign the drive letter or path (e.g. H). Click Next.
-
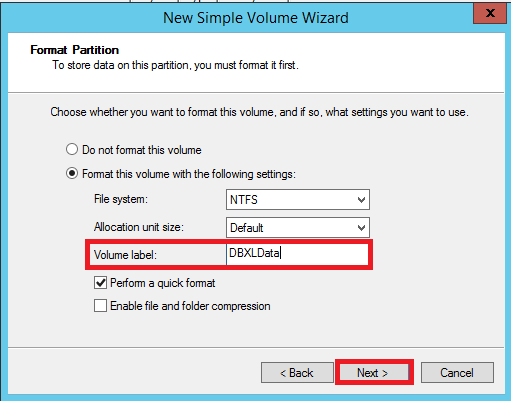
For the Format Partition, enter the Volume label name (e.g. DBXLData). Click Next.
-
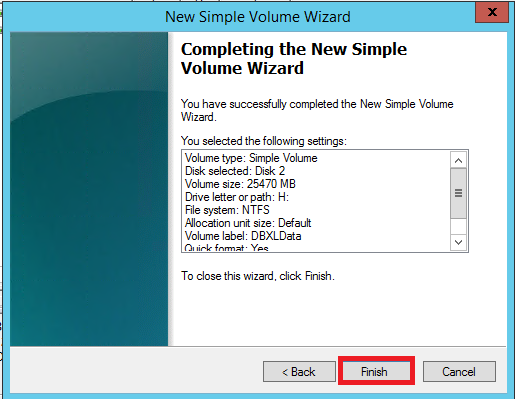
Click Finish in the next window, to complete the New Simple Volume Wizard.
-
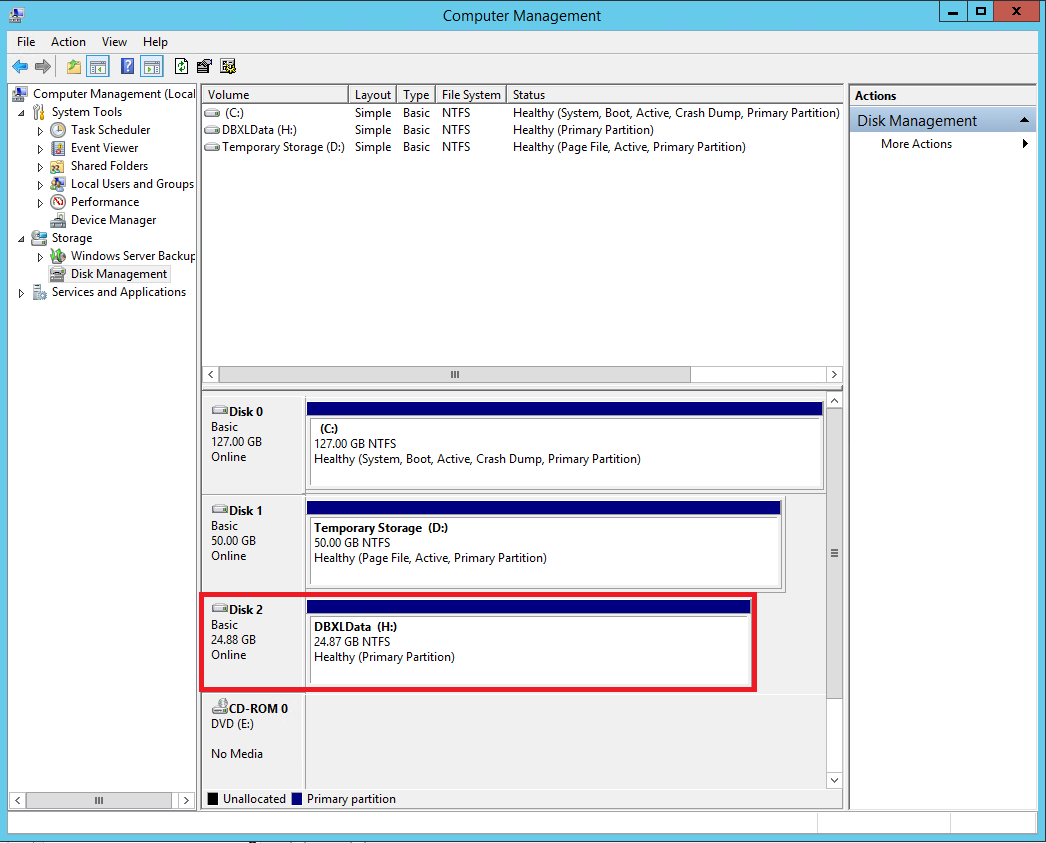
In the Disk Management window, Disk 2 will now have a Volume Label name (DBXLData), drive letter (H:) and size (24.87GB).
3.2.2 Install the Web Server (IIS) and .NET Framework 3.5
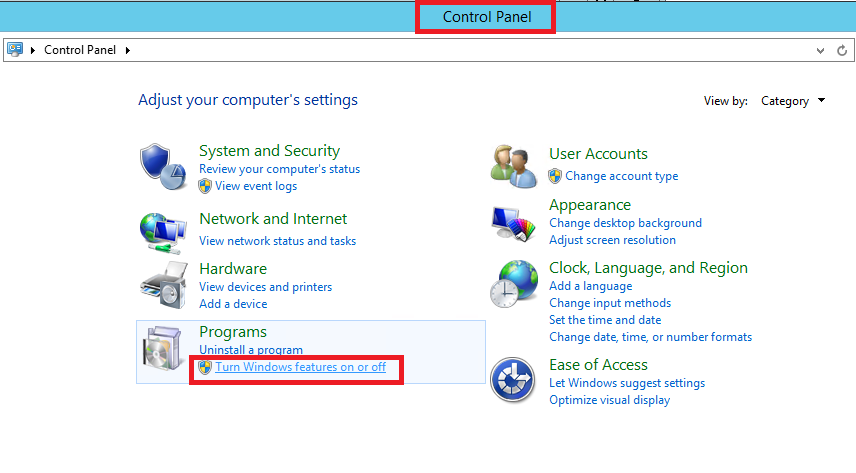
- Open the Control Panel and click Turn Windows features on or off, under Programs.
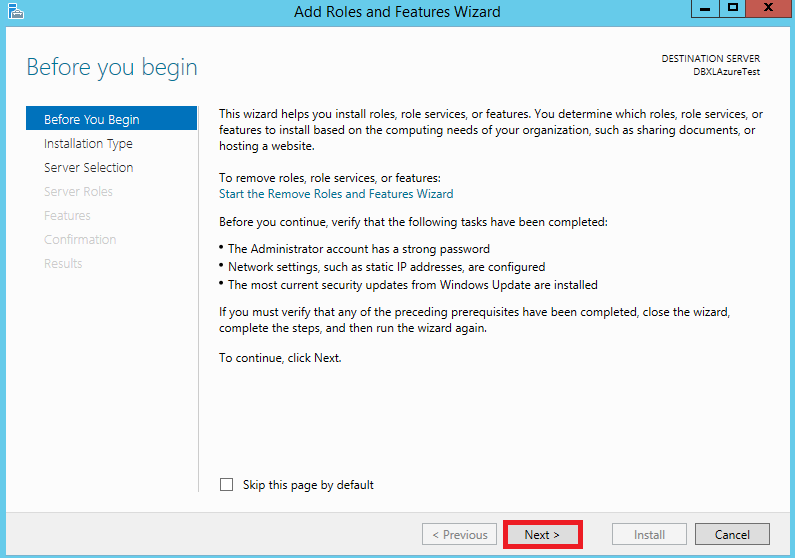
- The Add Roles and Features Wizard opens. Click Next.
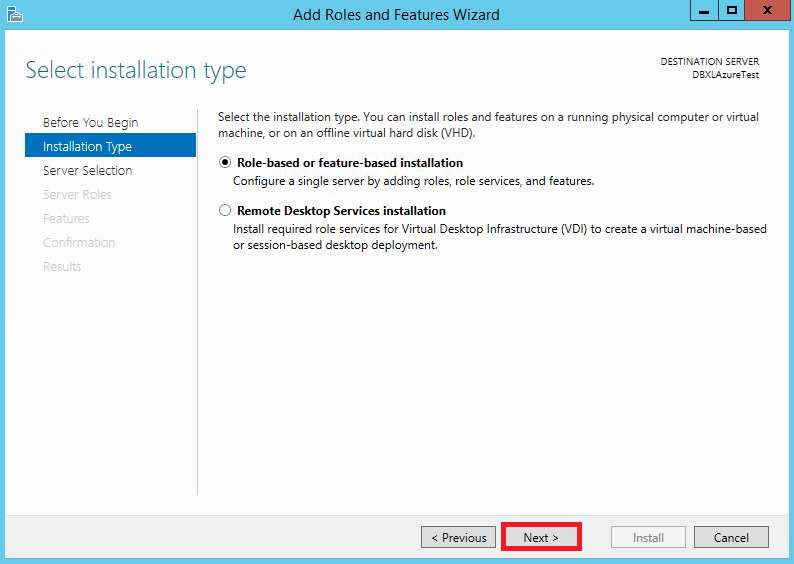
- Click Next on the Installation Type window.
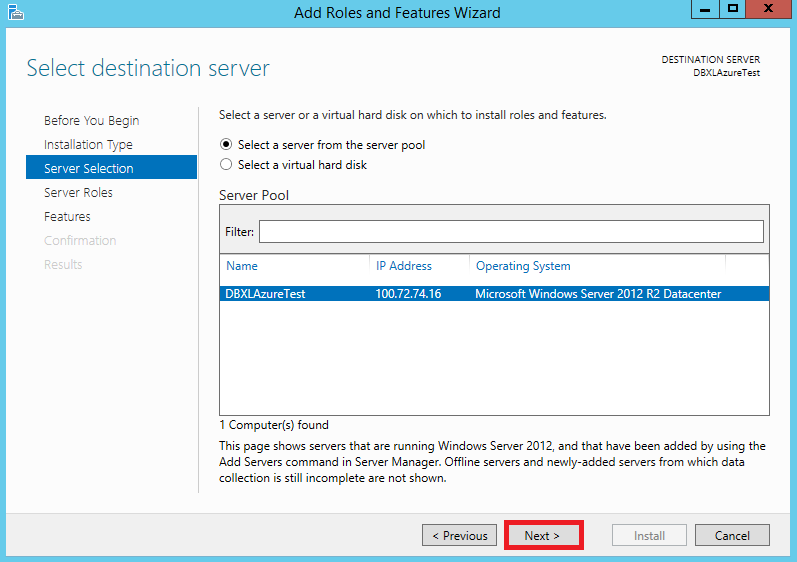
- Click Next on the Server Selection window.
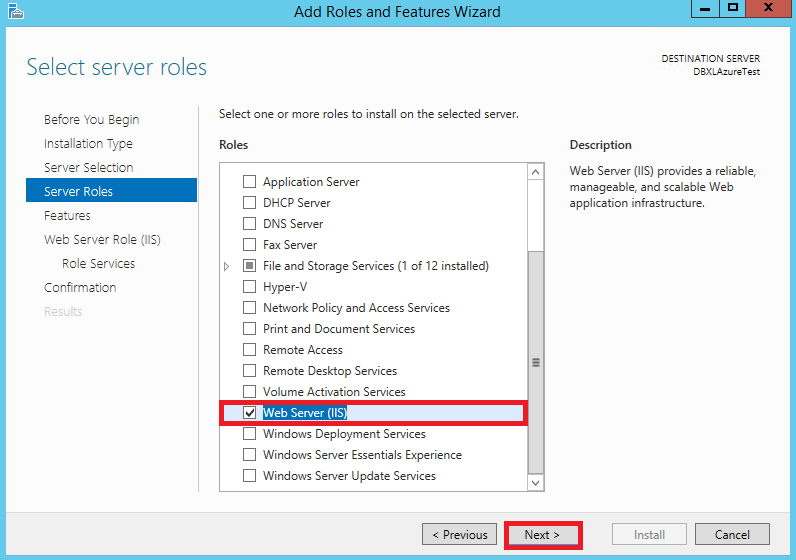
- Check Web Server (IIS) on the Server Roles window. Click Next.
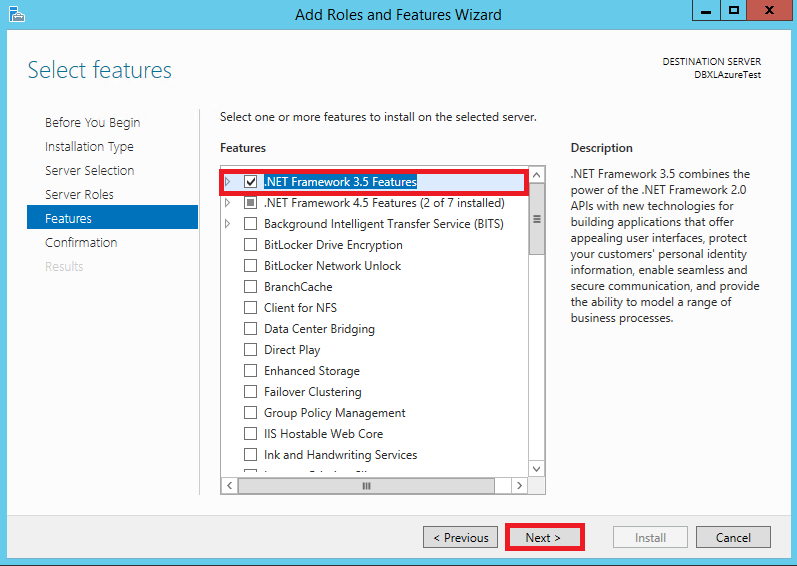
- Check the .NET Framework 3.5 Features on the Select Features window. Click Next.
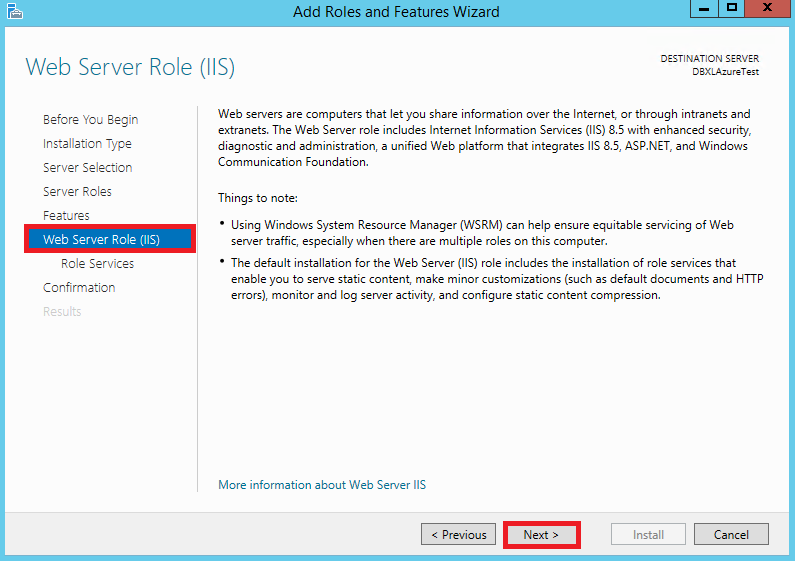
- Click Next on the Web Server Role (IIS) window.
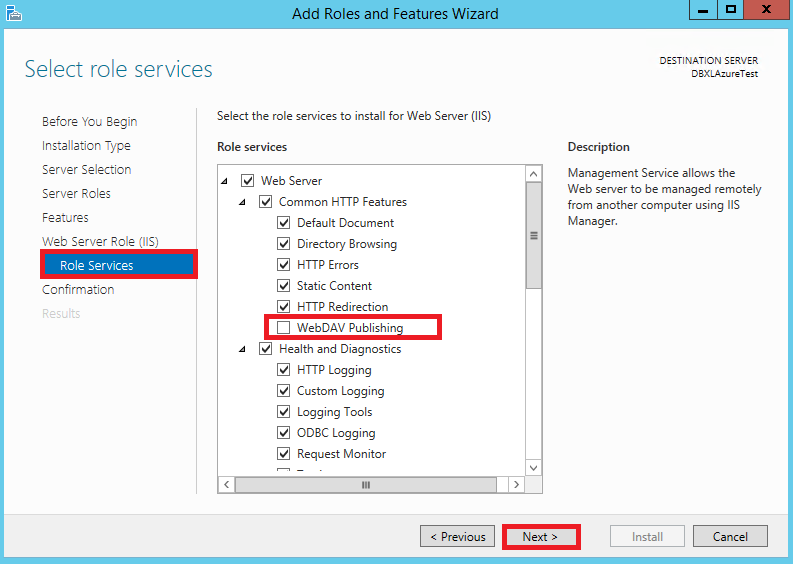
- On the Roles Services window, check all the boxes except for WebDAV Publishing. Click Next.
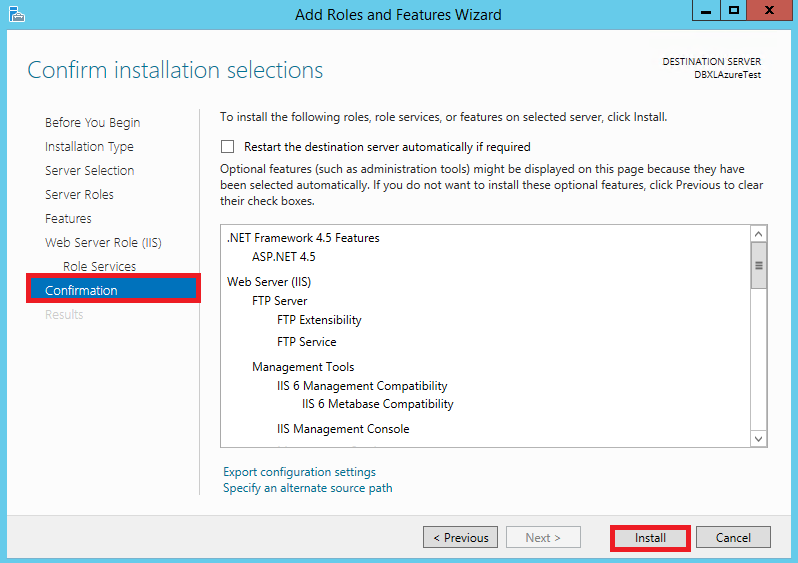
- On the Confirmation window, click Install.
-
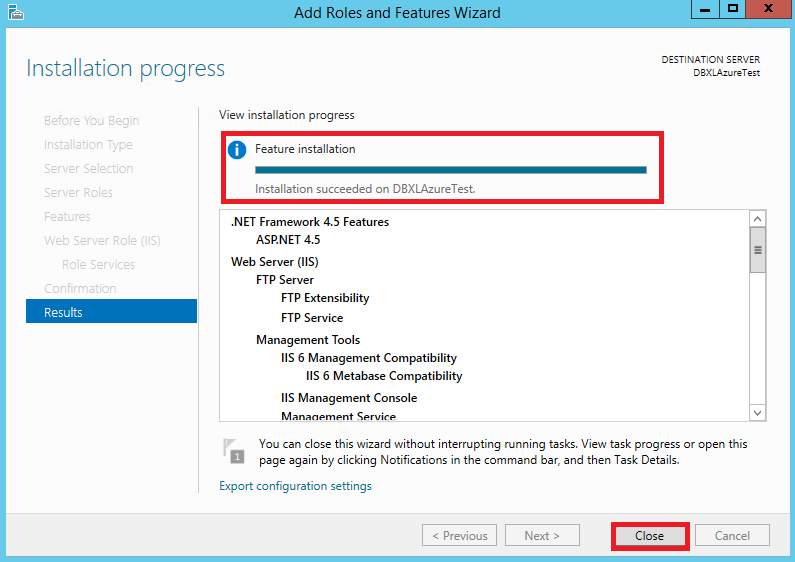
Once the installation is successful, click Close.
-
Open the Control Panel again and select Turn Windows Features on and off under Programs.
-
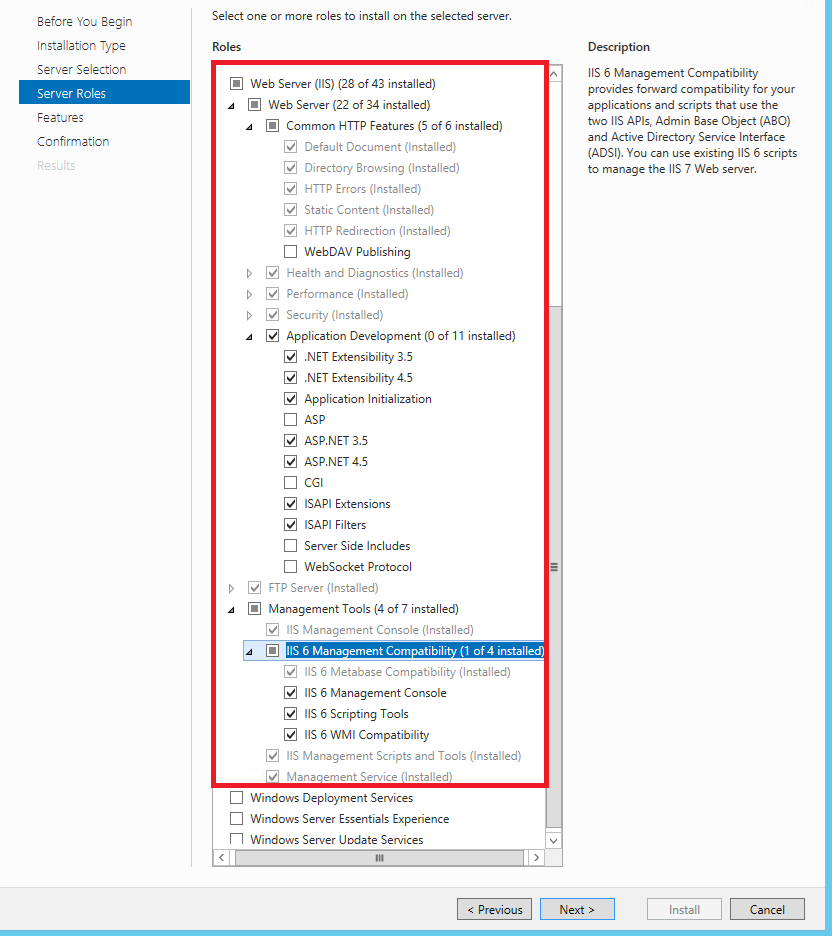
Click Next 3 times until you reach the Server Roles window. On Server Roles, select the uninstalled roles under Web Server (IIS) shown in the screenshot below:
-
Click Install and Close the dialog box after the install is successful.
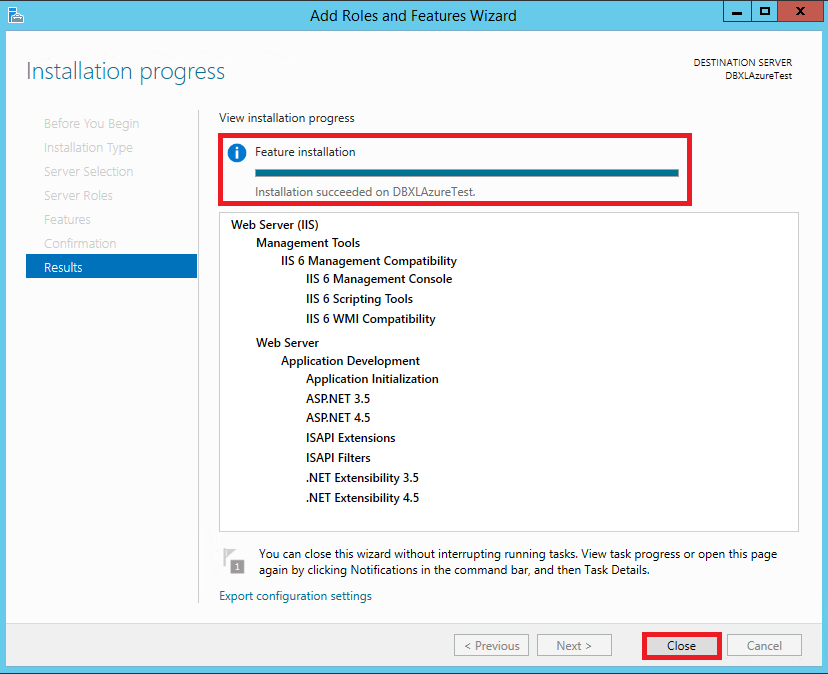
3.2.3 SQL Server Express 2014 Installation
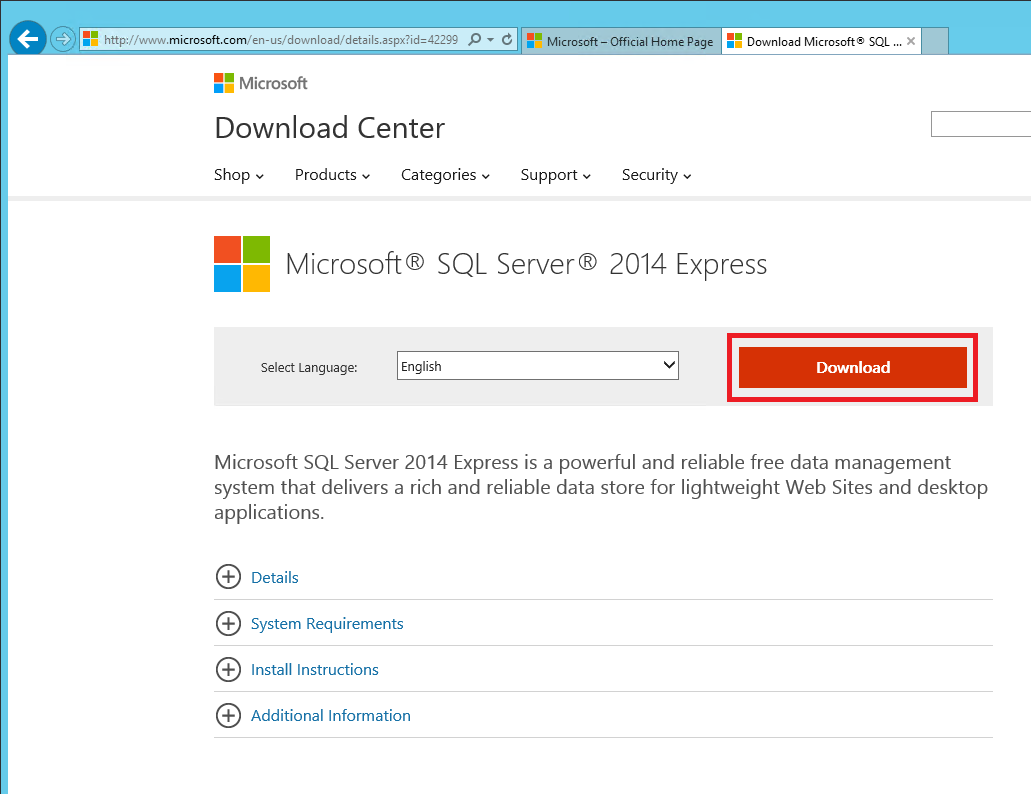
- Open Internet Explorer and type in the Microsoft URL for downloading SQL Server Express 2014 Edition.
- Once the download screen opens, click the gear icon at the top-right corner of IE to expand it.
- Select Internet Options. Click the Security tab and select Trusted Sites.
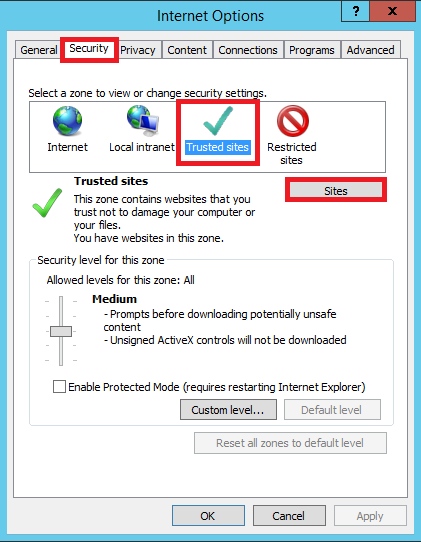
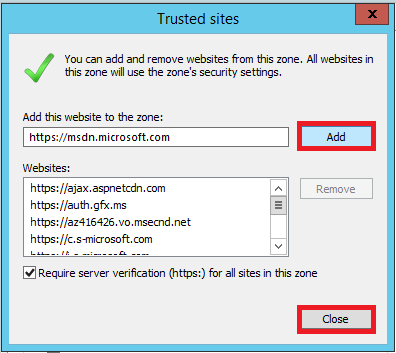
- Click Sites and Add the site. Click Close.
- Go back to the SQL Server Express 2014 Edition download page in Internet Explorer and click Download.
- Select ExpressAdv 64BIT\SQLEXPRADV_x64_ENU.exe and click Next.
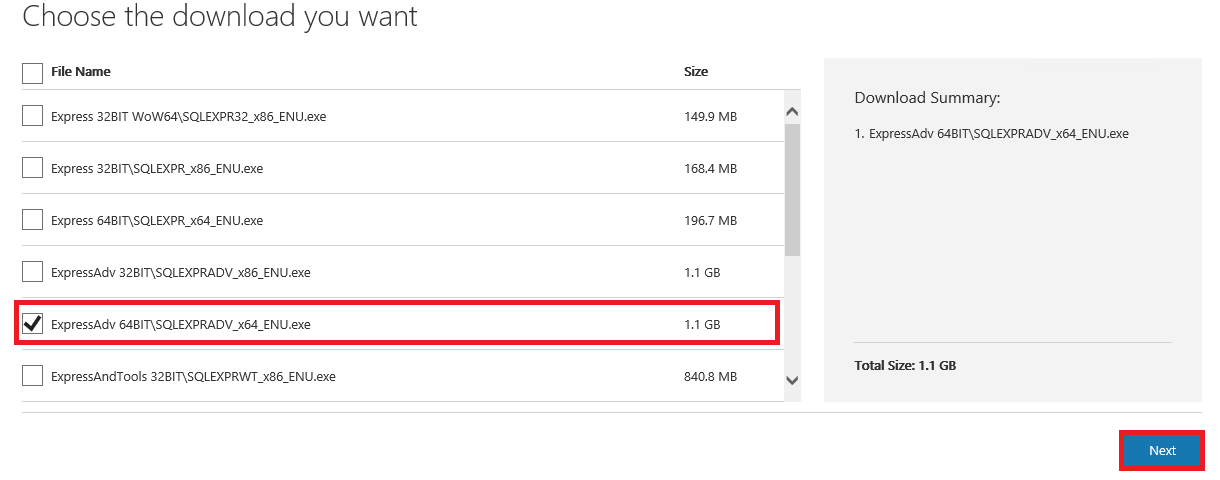
- Save the SQLEXPRADV_x64_ENU.exe.
- Once it is saved, click Run.
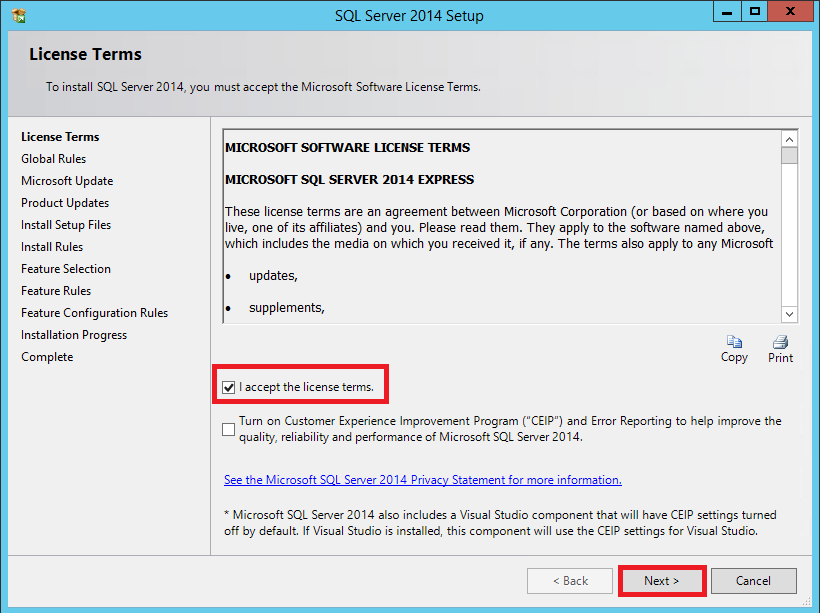
- The SQL Server 2014 Setup window opens. Check the box to accept the license terms. Click Next.
-
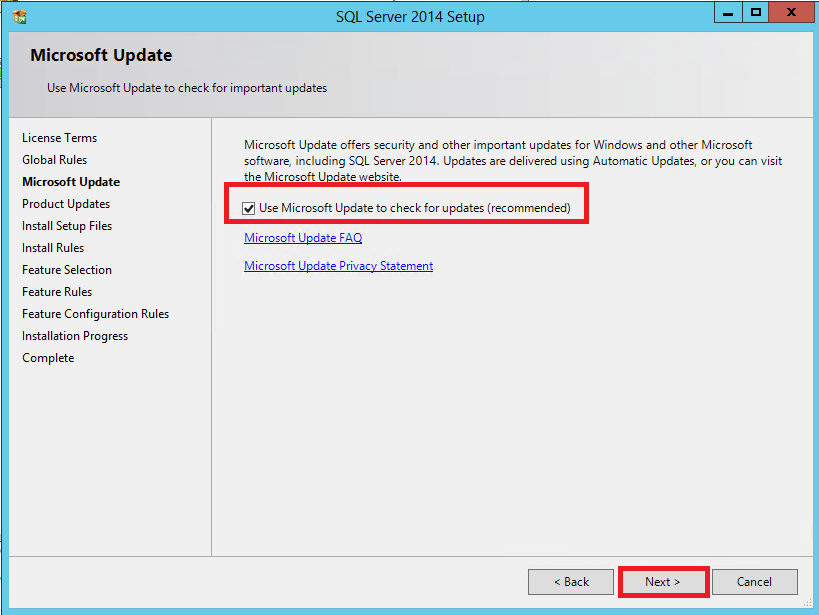
Check the box for Microsoft Update and click Next.
-
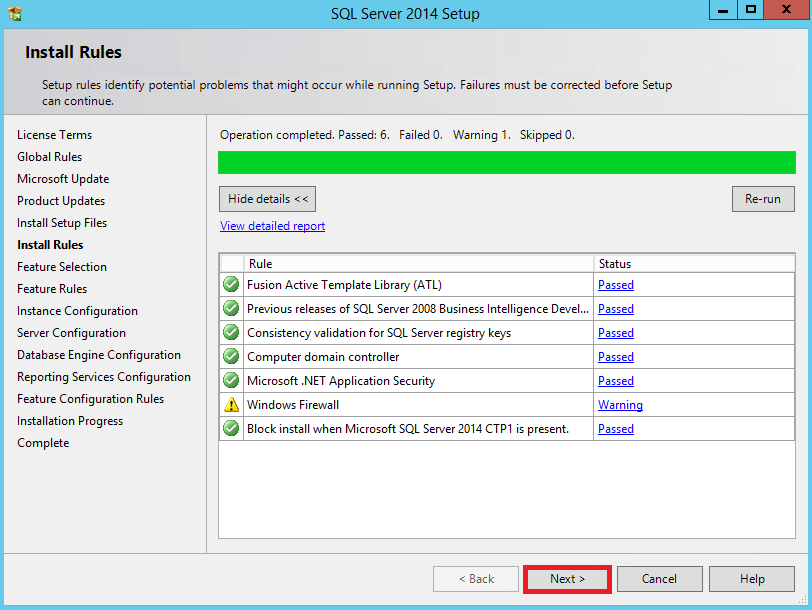
On the Install Rules window, click Next.
-
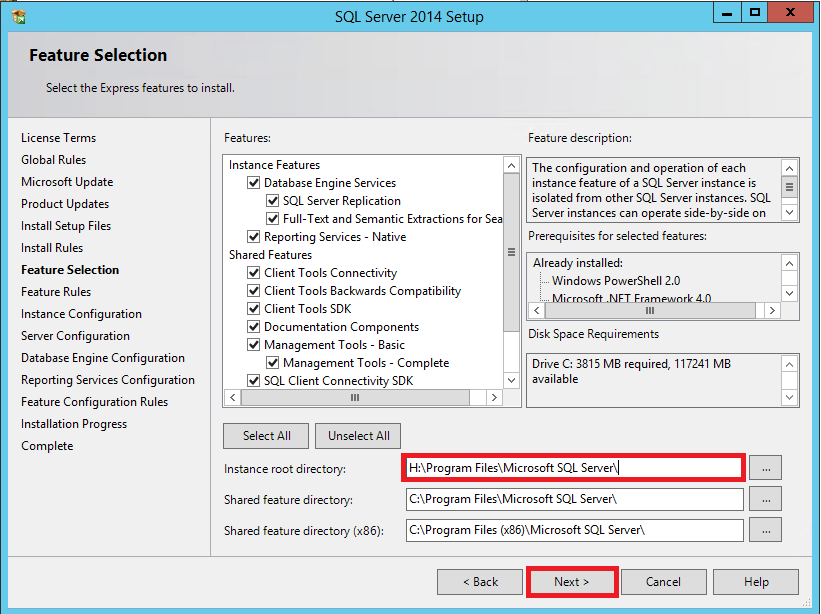
For the Feature Selection, change the Instance root directory to the drive you chose earlier (H:).
-
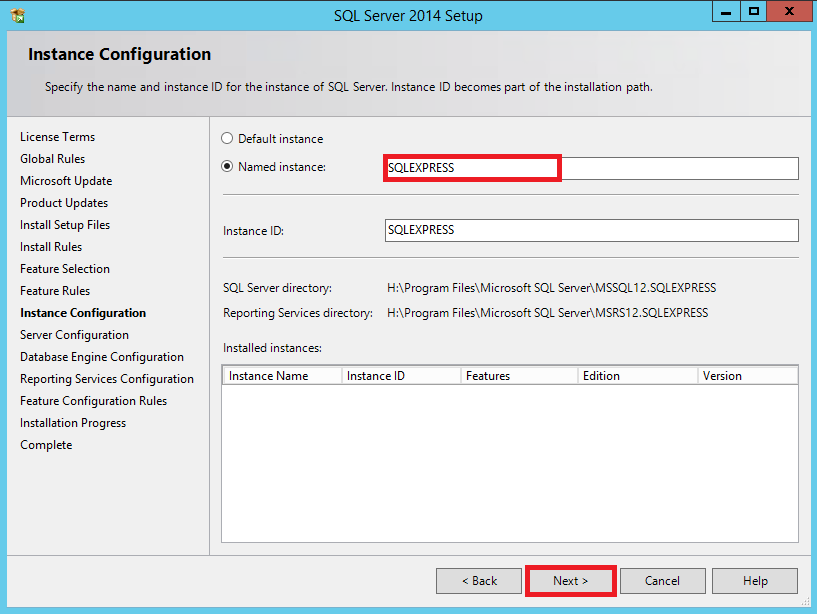
On the Instance Configuration window, keep the default name for the Named instance (SQLEXPRESS) and click Next.
-
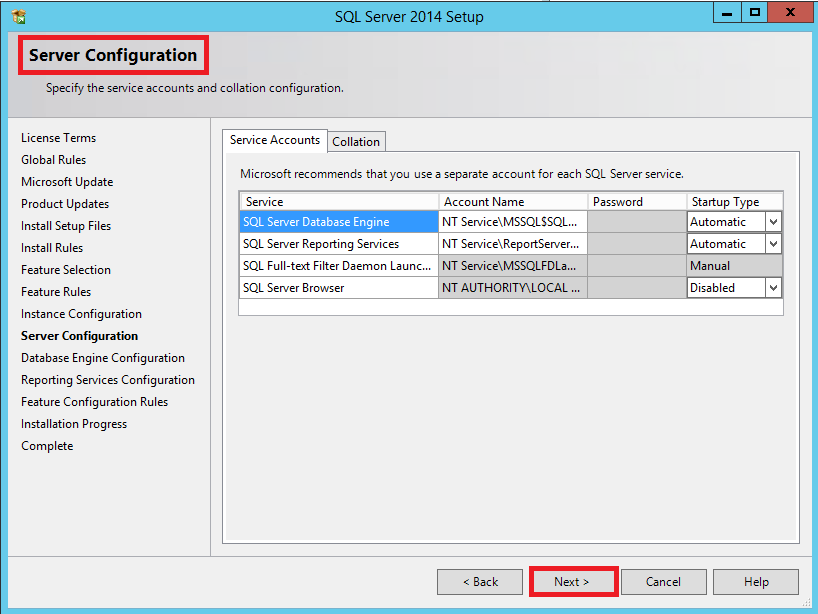
On the Server Configuration window, click Next.
-
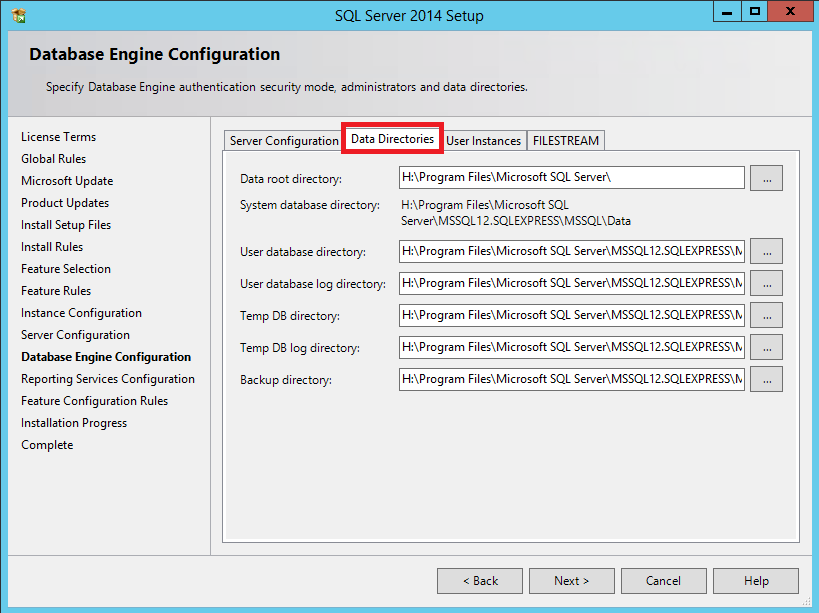
On the Database Engine Configuration, click the Data Directories tab. Check that the directory is pointing to the drive chosen by you.
-
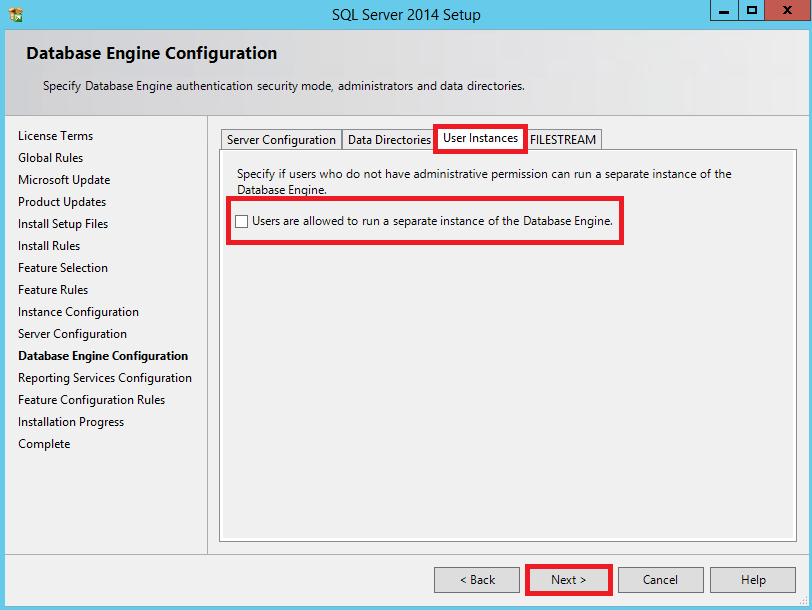
Click the User Instance tab and uncheck the box. Click Next.
-
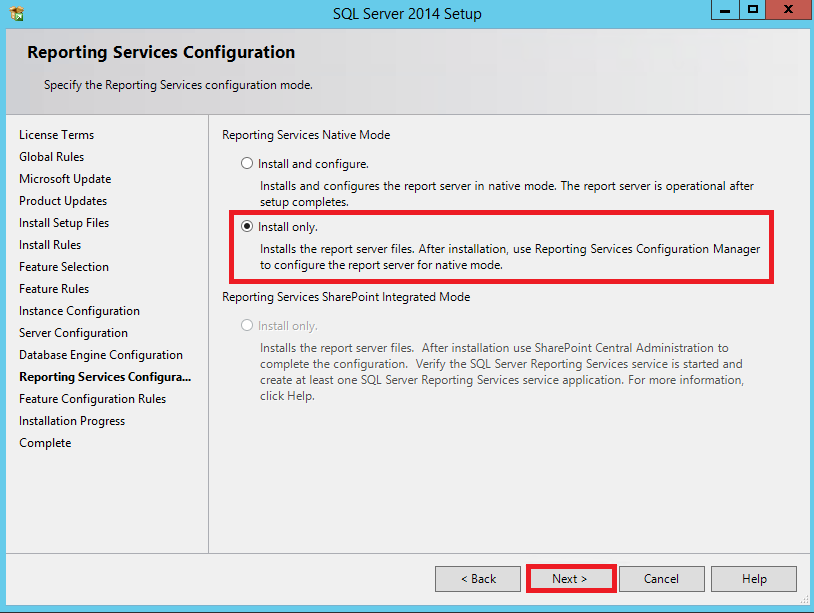
Click Install Only on the Reporting Services Configuration window. Click Next.
-
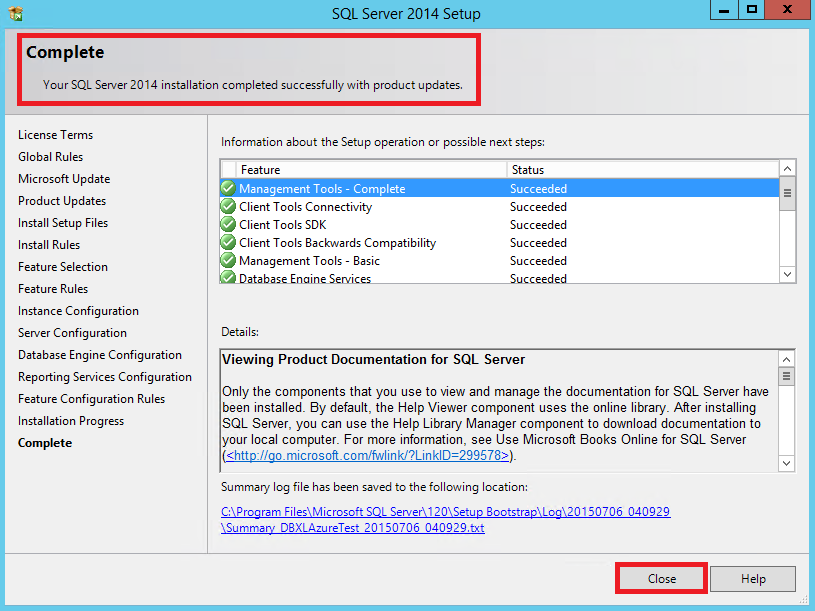
The Installation progress window shows the progress. When the installation is Complete, click Close.
3.3 DBXL v3.6 Installation
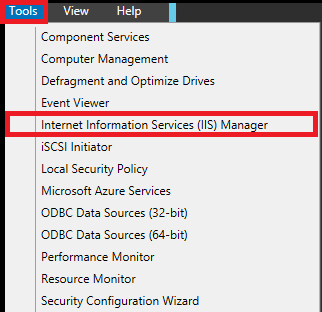
- Open the Server Manager. Click Tools in the upper-right corner and select IIS Manager.
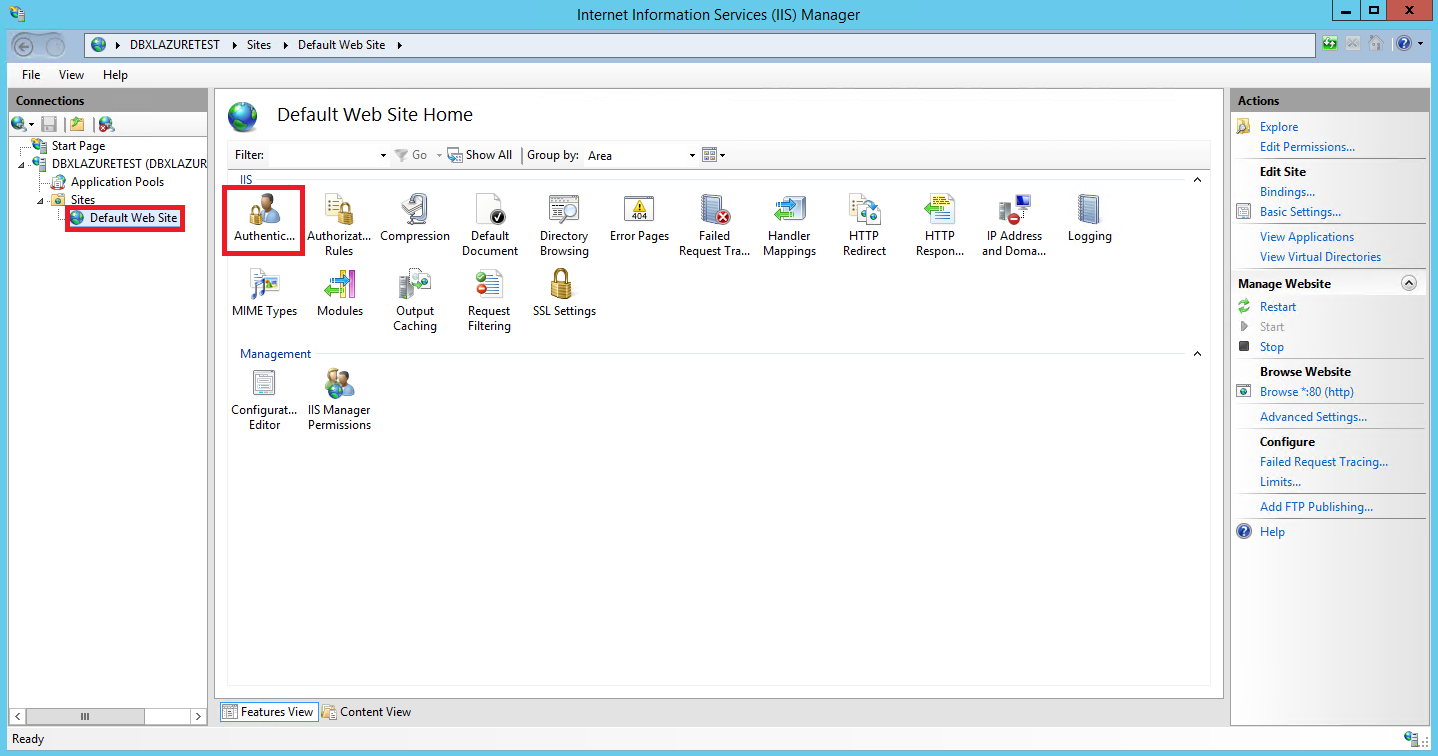
- In the IIS Manager window, expand the sites and click Default Web Site.
- On the right side, double-click Authentication.
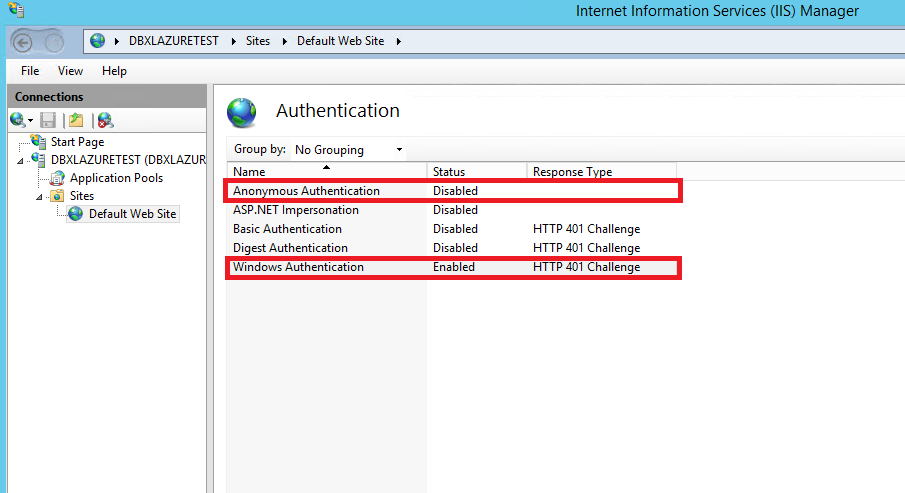
- Disable the Anonymous Authentication and Enable the Windows Authentication.
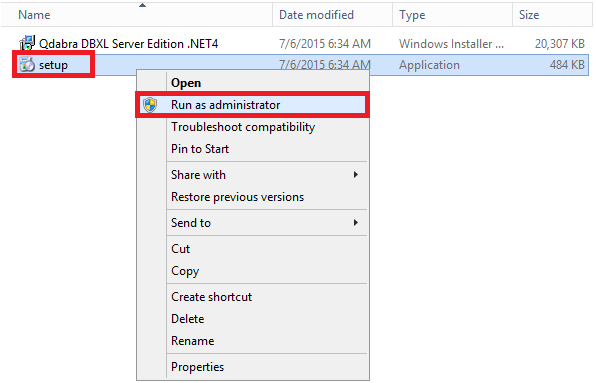
- Go to the location where you have saved the DBXL installation package (
Qdabra DBXL Server Edition.msi). - Right-click setup and Run as Admin.
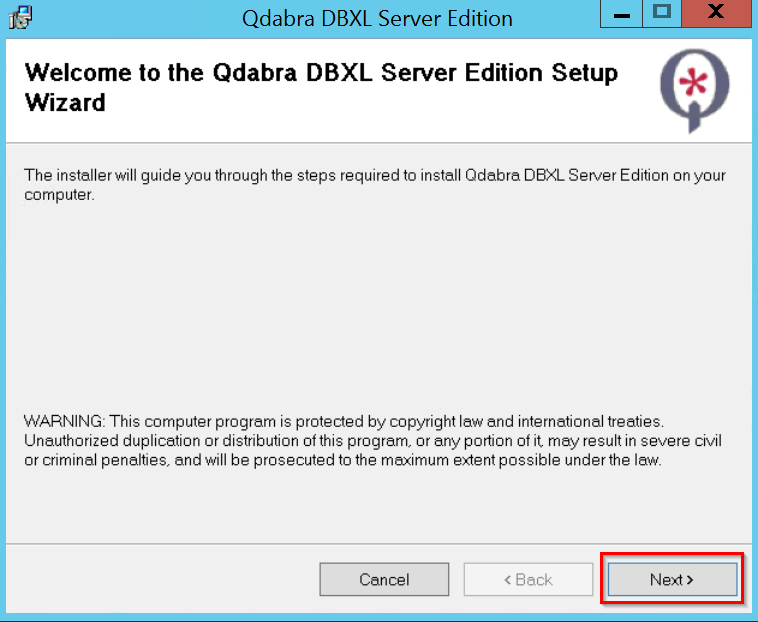
- The Qdabra DBXL Server Edition window appears. Click Next.
- Select 'I Agree' on the License Agreement and click Next.
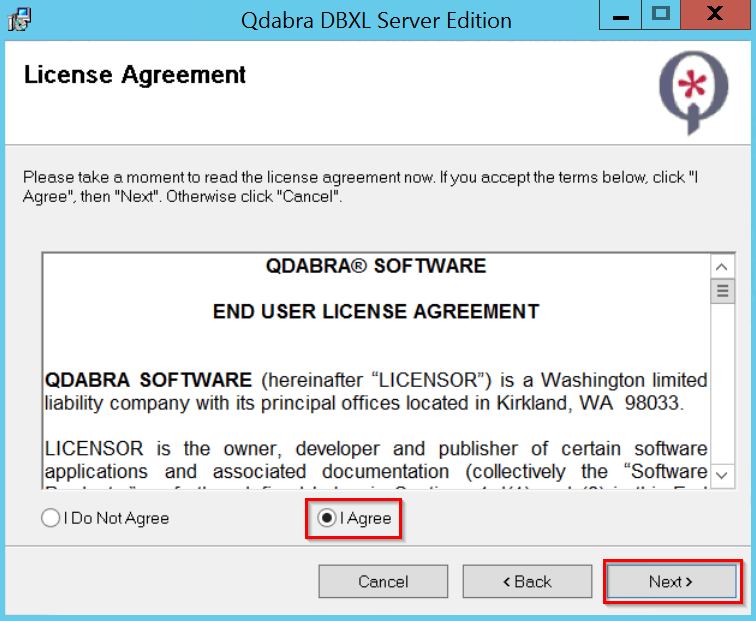
- Click Next.
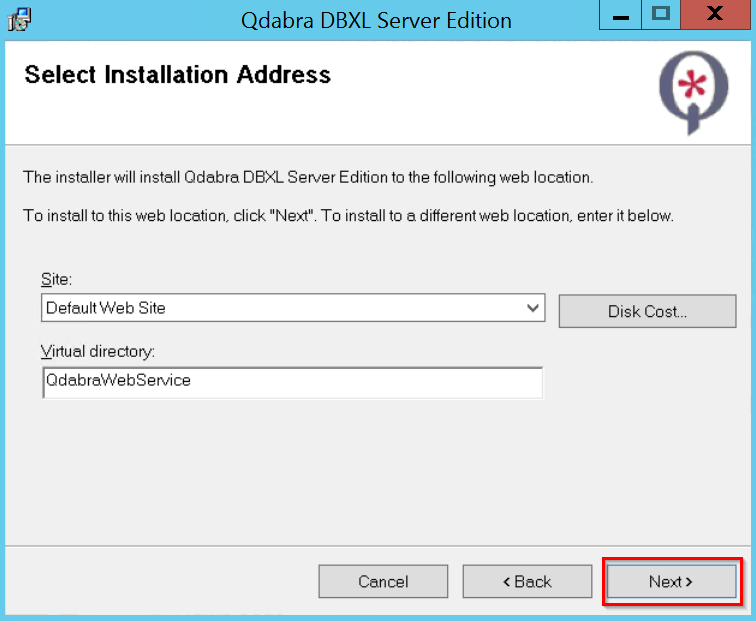
-
In the Installation Address window, select Default Web Site if that applies to you. Click Next.
-
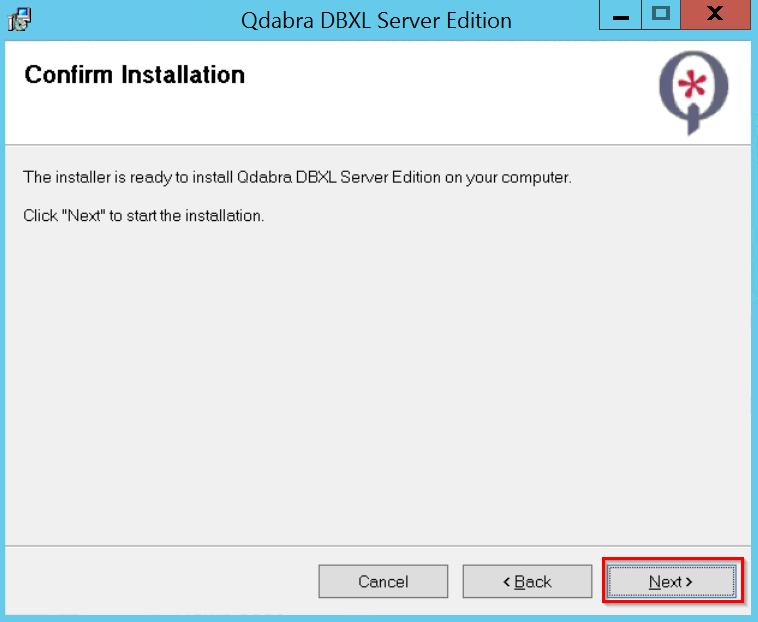
Click Next on the Confirm Installation window.
-
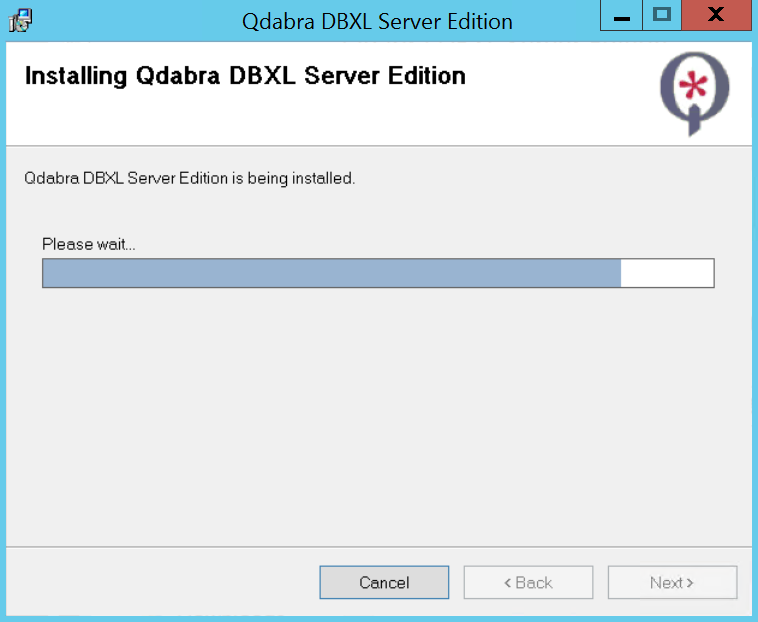
A progress bar shows the Qdabra DBXL Server Edition installation.
-
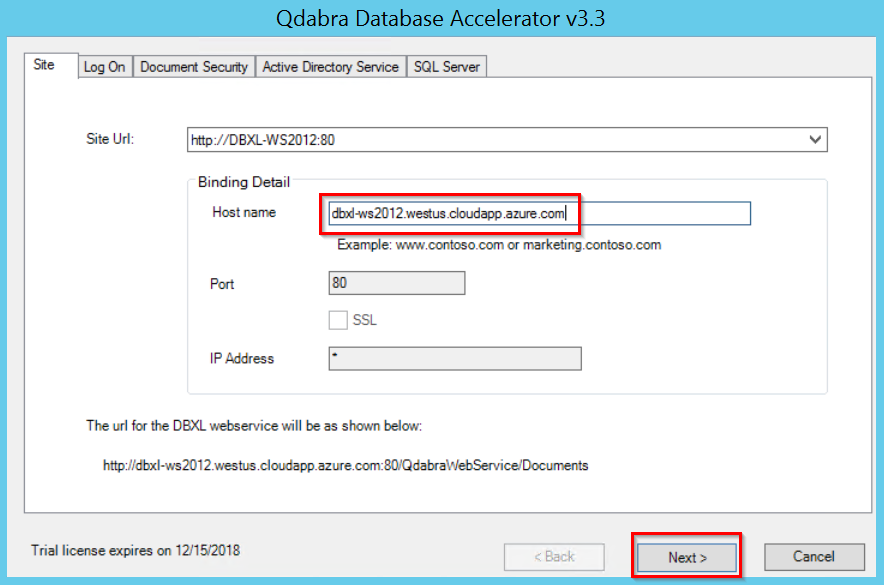
In the Qdabra Database Accelerator v3.6 window, for Site:
- Site URL - enter your Site URL
- HostName - enter the fully qualified host name (add .cloudapp.net at the end of your Host name, or whichever applies as your fully qualified host name in Azure)
- Port - 80
-
Click Next.
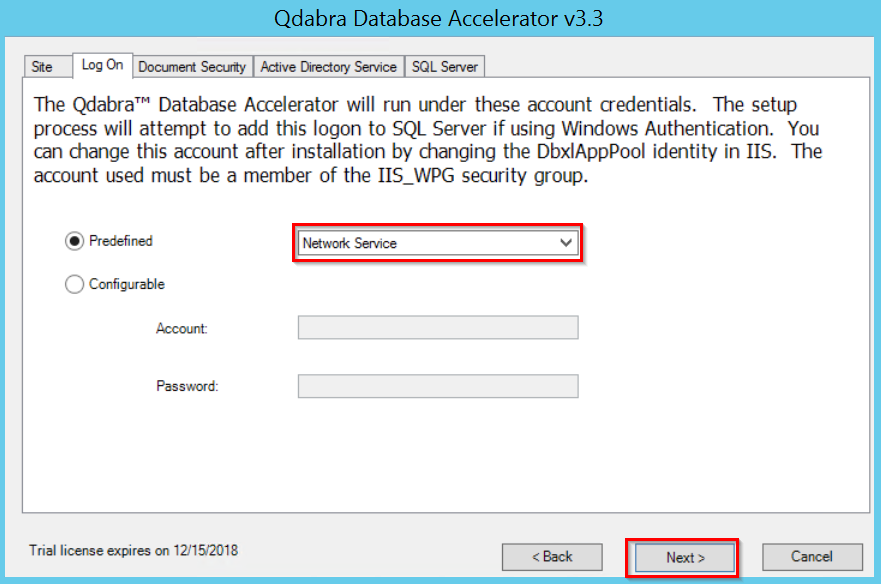
- For Log On:
- Predefined: select Network Service from the drop-down.
-
Click Next.
-
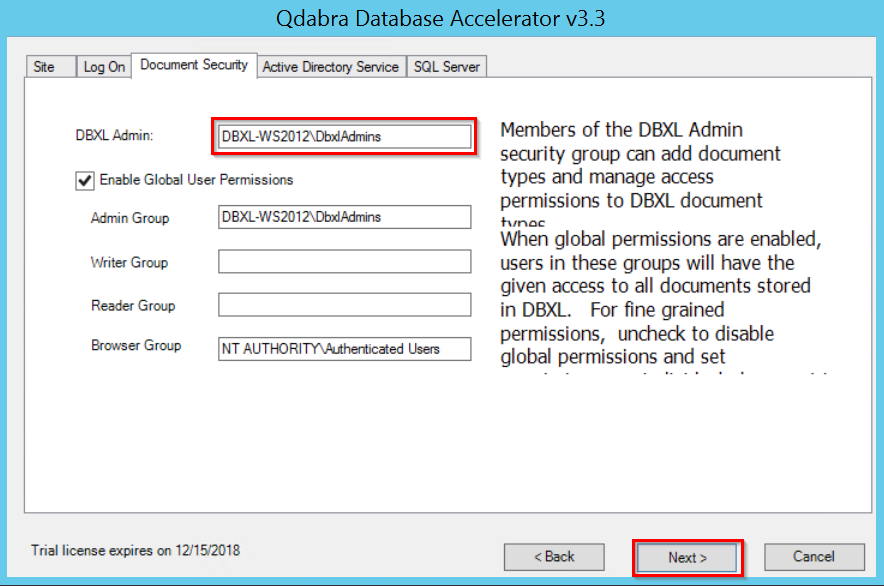
For Document Security:
- DBXL Admin: enter the DBXL Admin name
-
Click Next.
-
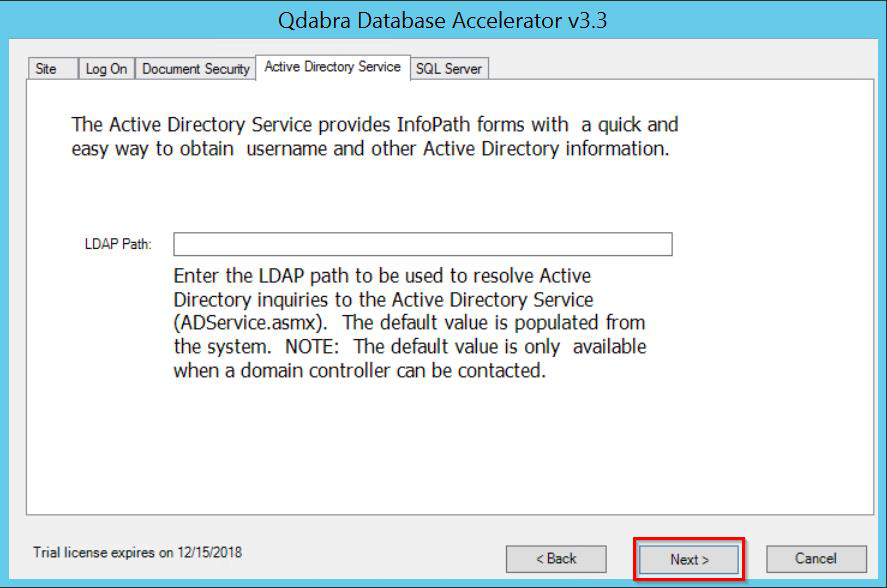
For the Active Directory Service, leave the LDAP Path blank. Click Next.
-
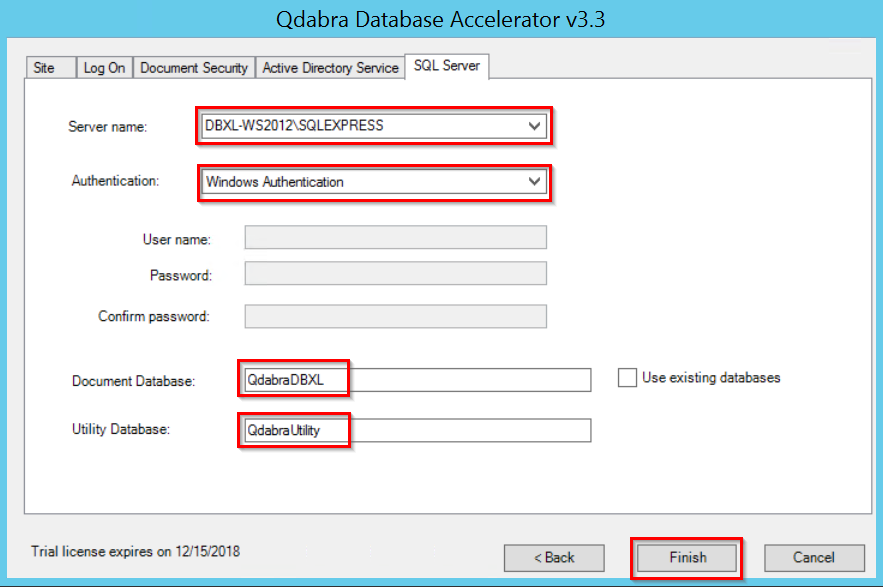
For SQL Server:
- Server name - enter the SQL server name (e.g.
(LOCAL)SQLEXPRESS) - Authentication - select Windows Authentication from the drop-down
- Document Database -
QdabraDBXL - Utility Database -
QdabraUtility
Note: If an existing database already exists, select the check box for "Use existing Databases".
- Server name - enter the SQL server name (e.g.
-
Click Finish.
-
When the installation has successfully completed, Close the Qdabra DBXL Server Edition window.
3.3.1 Configure QueryDBWithUserKey
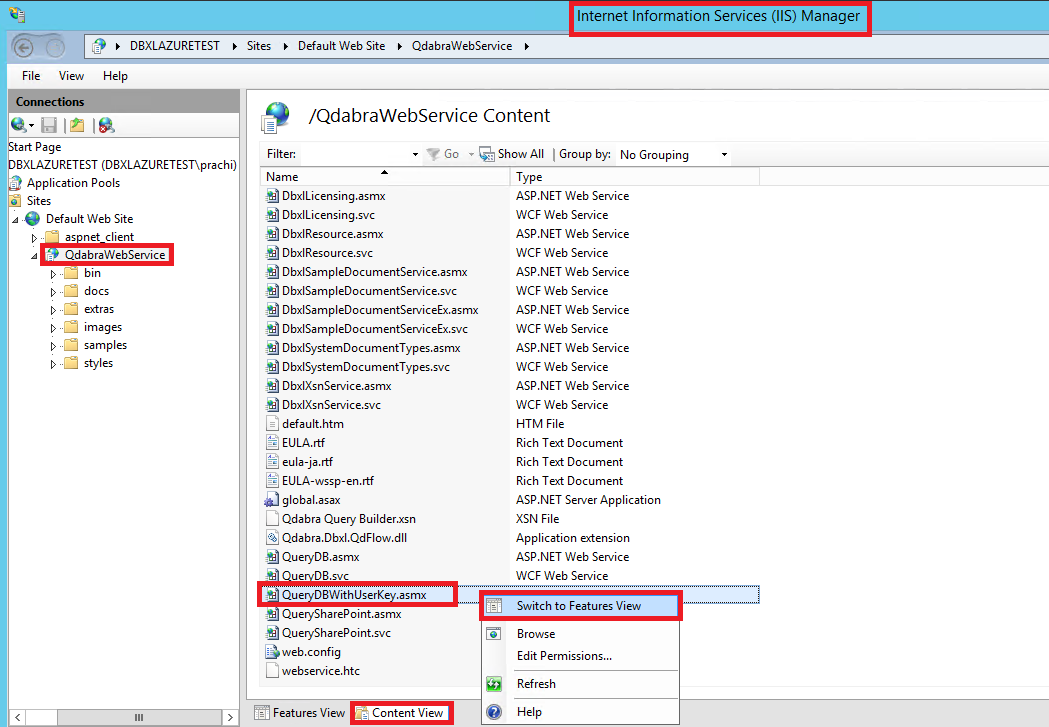
- Open the IIS Manager and expand Sites. Expand Default Web Site and select Qdabra Web Service.
- Click the Content View tab at the bottom.
- Scroll down until you find QueryDBWithUserKey.asmx. Right-click it and select "Switch to Feature View".
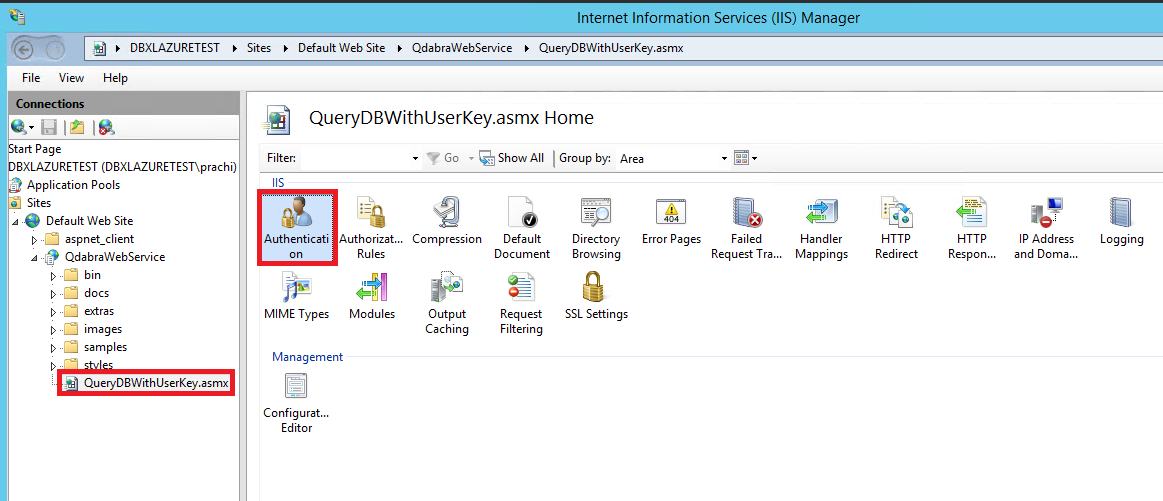
- Double-click Authentication.
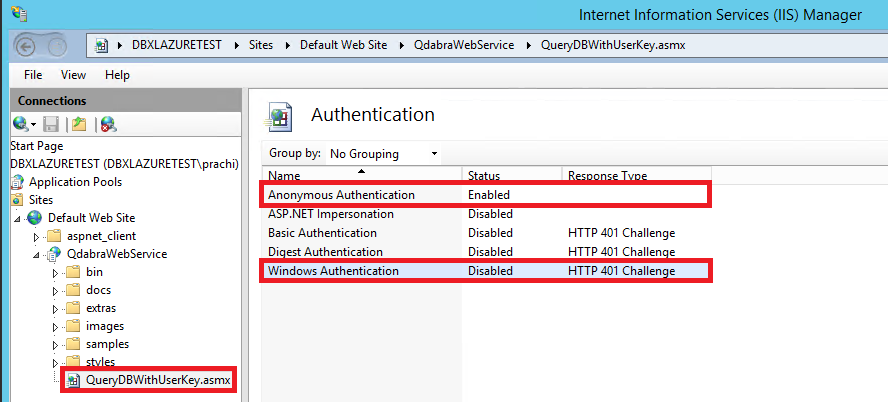
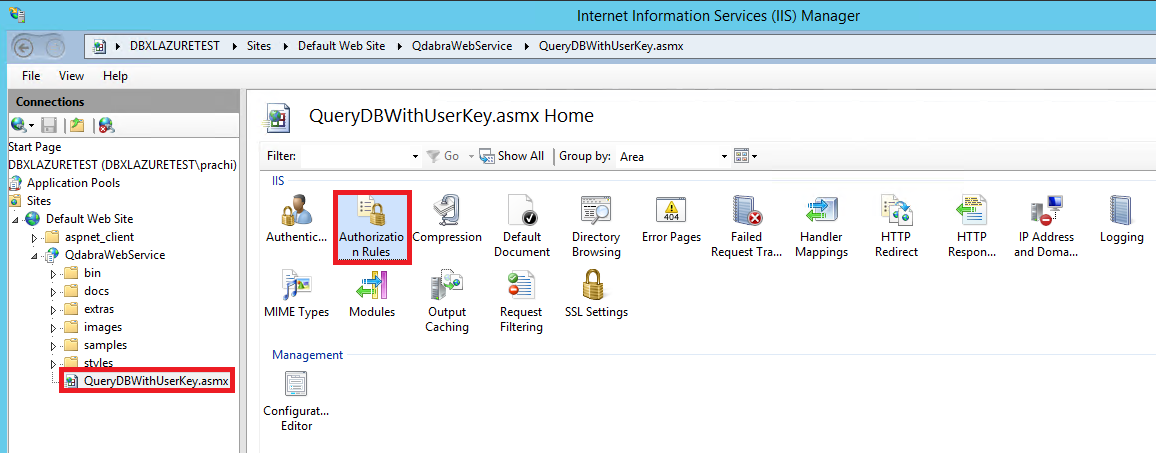
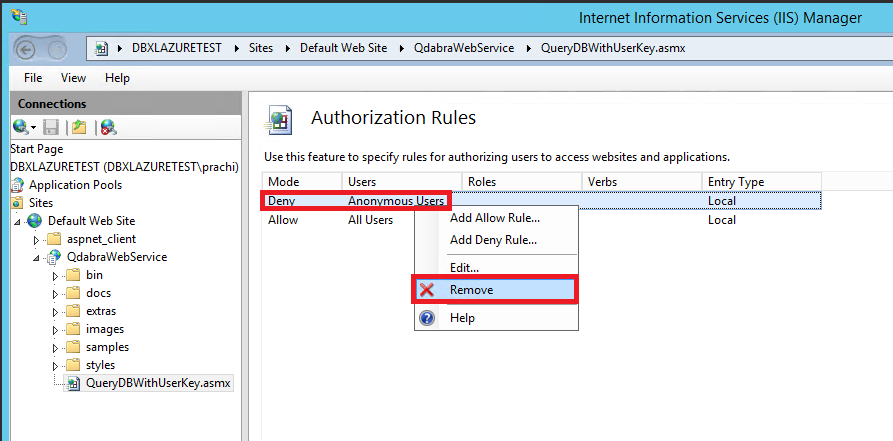
- To check if QueryDBWithUserKey.asmx is configured correctly, open Internet Explorer (IE).
- Enter the URL for the Qdabra Web service:
Syntax: http://<YourVirtualMachine>/QdabraWebService
Example: http://dbxlazure.cloudapp.net/QdabraWebService
- If you do not get a prompt for credentials and the DBXL Admin page opens, that means that the QueryDBWithUserKey service is configured as intended.
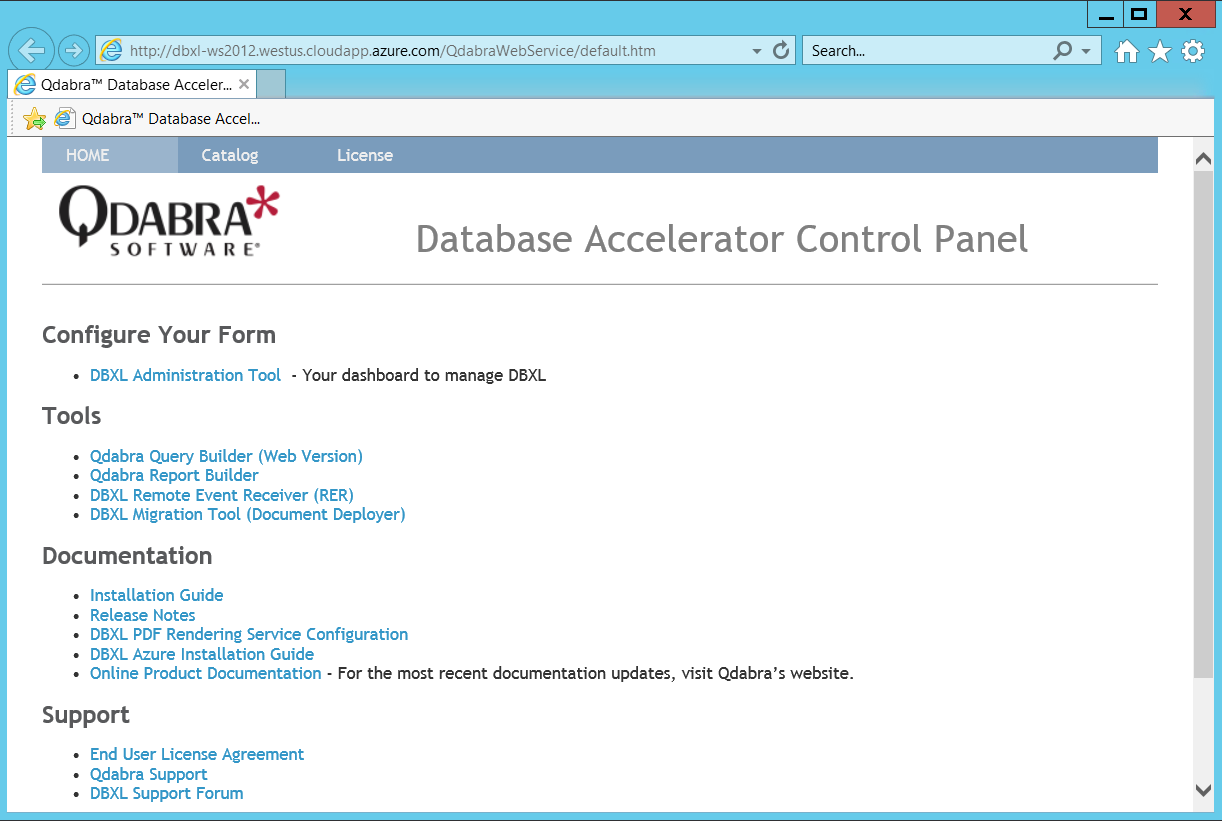
- You can use this URL whenever you are calling with the Anonymous connection by passing the key from Office 365.
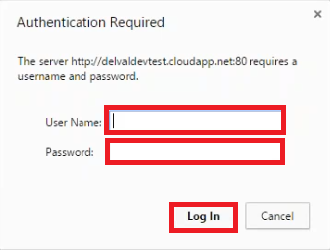
- If you want to access the Qdabra Web Service without the QueryDBWithUserKey.asmx service from your desktop, you will be prompted for your credentials.
3.3.2 Add a User Account
- Go to your server to create a new User Account.
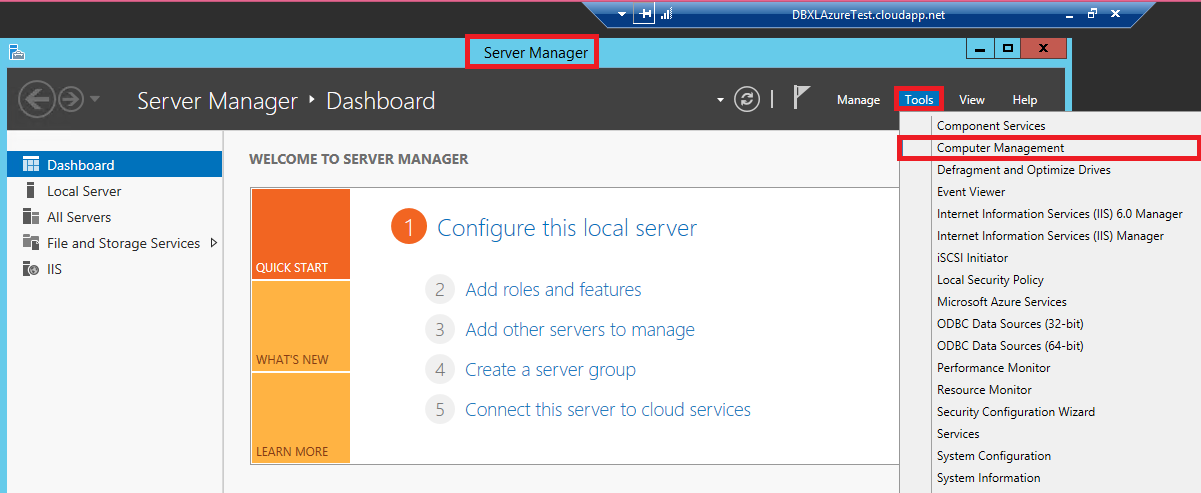
- Open Server Manager. Click Tools and select Computer Management.
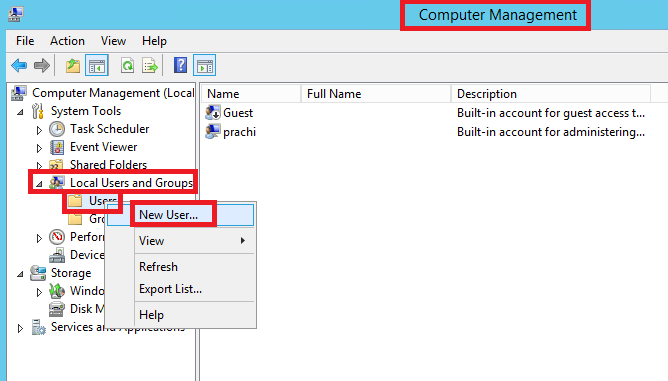
- In the Computer Management window, expand "Local Users and Group".
- Right-click Users and select New User.
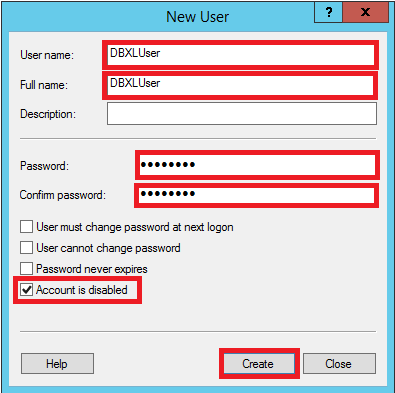
- In the New User window:
- User name - enter the User name for the shared user account (e.g. DBXLUser)
- Full name - enter a name. This can be the same as User name (e.g. DBXLUser)
- Password - give a password for this user account
- Click Create. Click Close in the next window.
- A new User Account is created.
3.3.3 Generate a Key for the New User Account
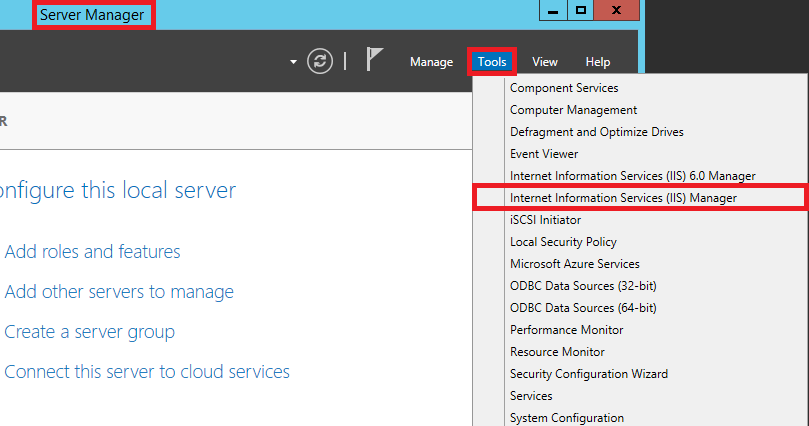
- Open Server Manager from your Server system. Go to Tools and select IIS Manager.
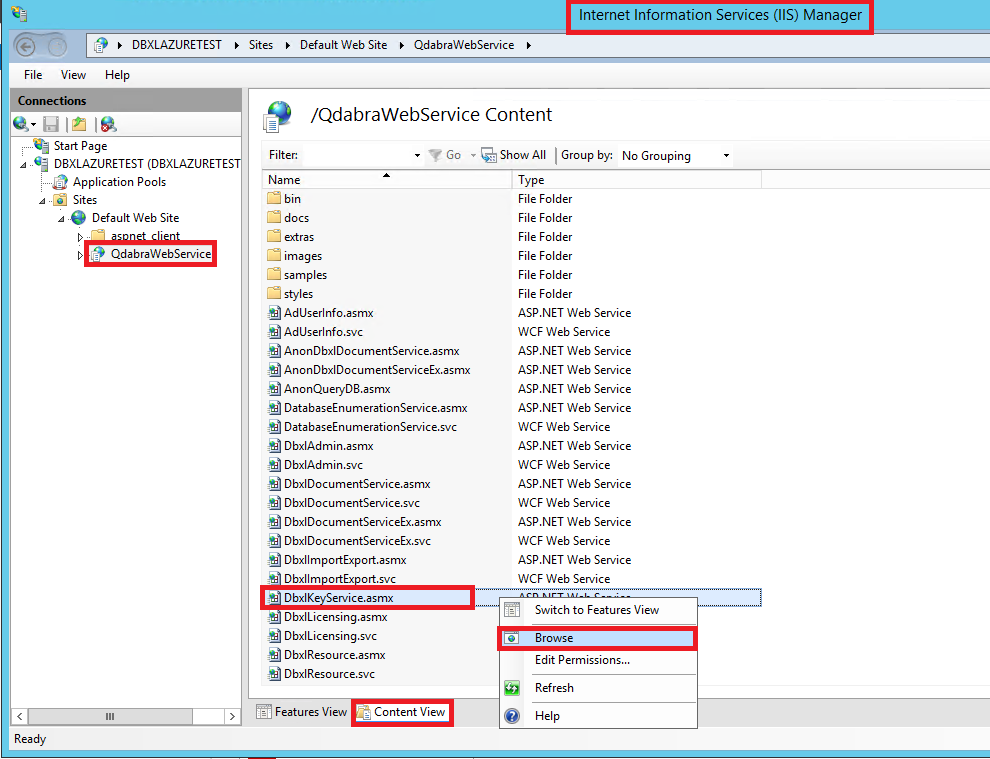
- In IIS, expand the Server name, expand Sites, expand Default Web Site and select Qdabra Web Service.
- Click the Content View tab at the bottom and look for DBXLKeyService.asmx.
- Right-click DBXLKeyService.asmx and select Browse.
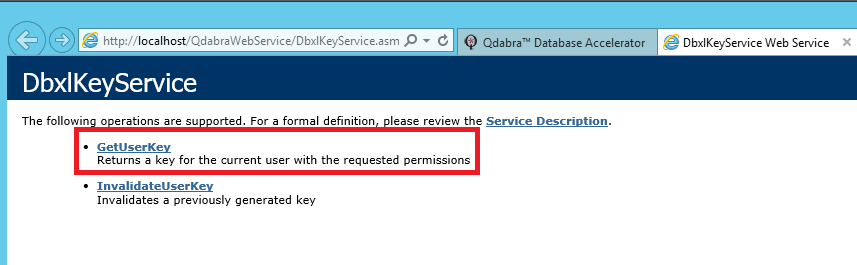
- DbxlKeyService opens in the browser. Click GetUserKey.
- To generate a user key for the new user account, enter the Username of the new user that you created in the "Adding a User Account" section.
- Click the Invoke button.
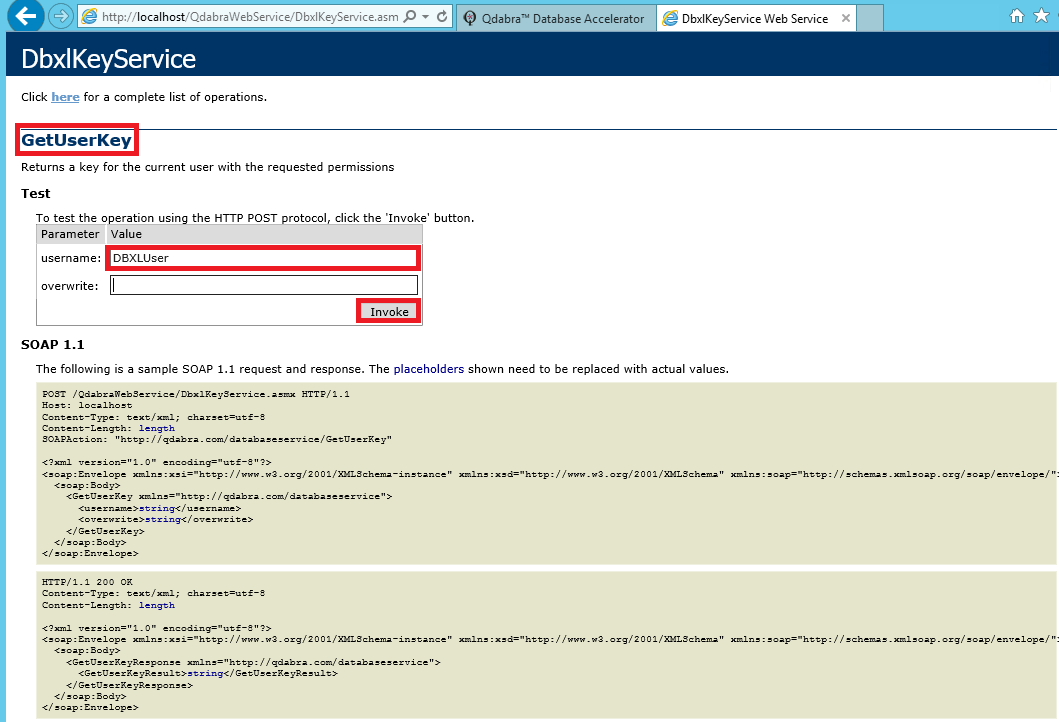
- This will generate a Key.

- Copy the Key value and paste it into a Notepad window.
Note: You will need the key later, to verify that this Key can be used to query the database.
3.3.4 Using QueryDBWithUserKey Service
- Open IIS Manager and select Qdabra Web Service. Click the Content View tab.
- Look for QueryDBWithUserKey.asmx and right-click it. Select Browse.
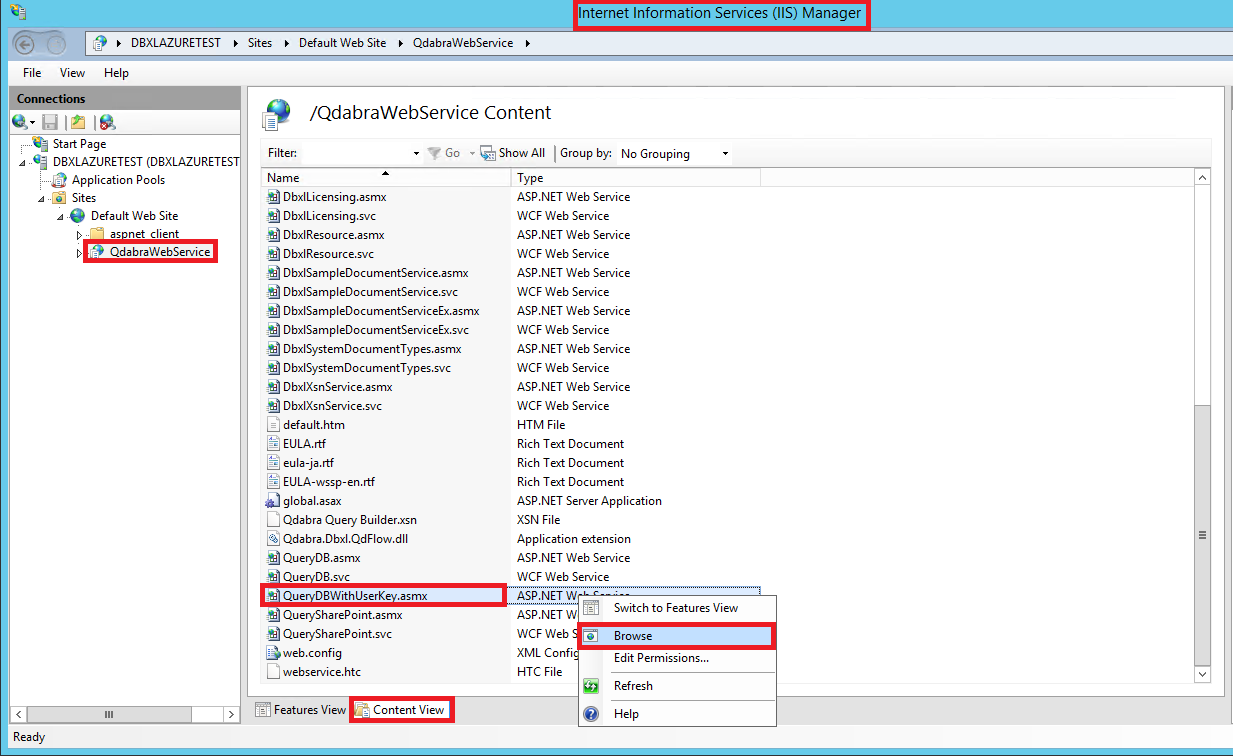
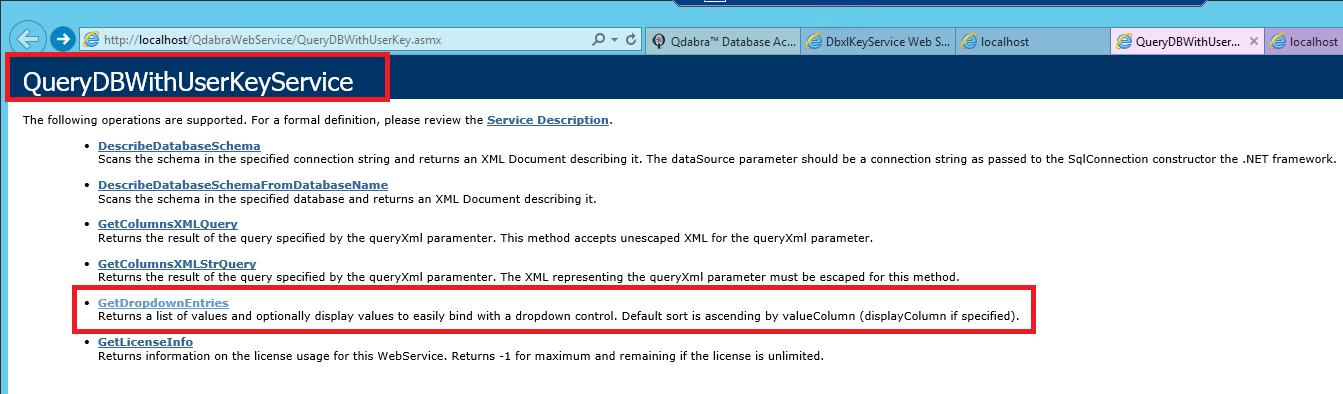
- QueryDBWithUserKeyService opens. Select GetDropdownEntries.
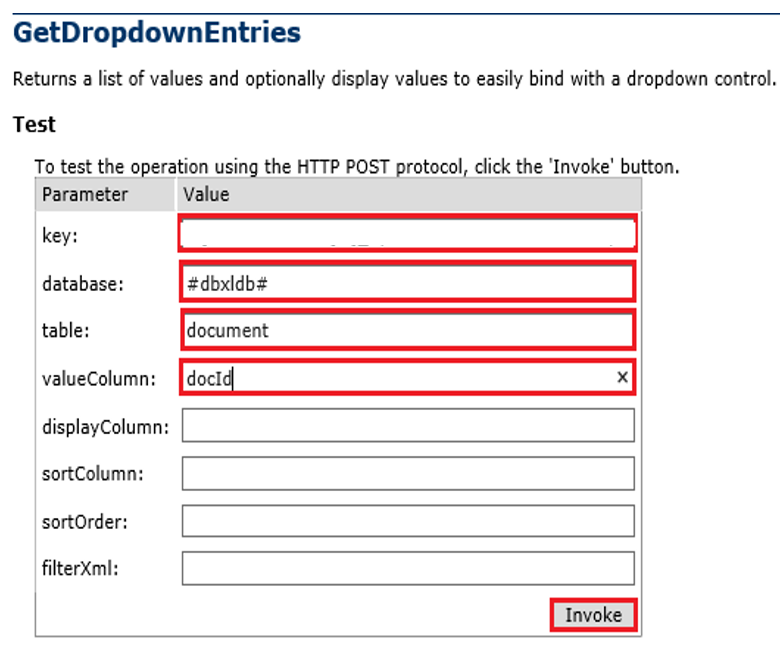
- For GetDropdownEntries:
- Key - paste the key value that you copied into Notepad earlier
- Database - enter "
#dbxldb#" - Table - enter "
document" - ValueColumn - enter "
docId" - Click Invoke.
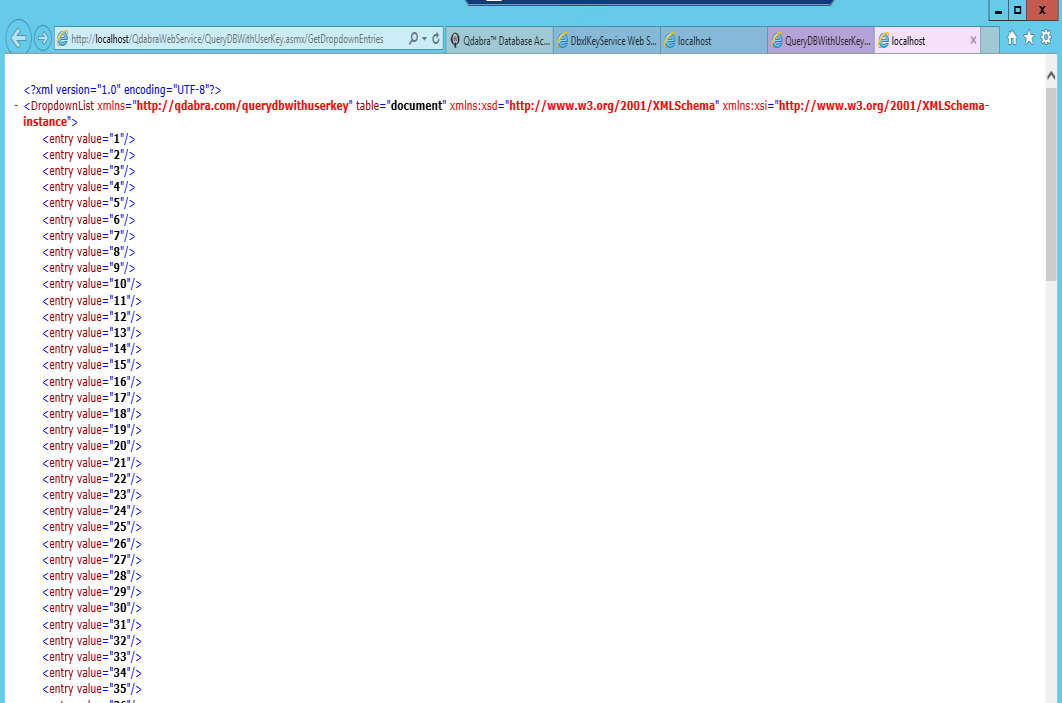
- If the DropdownList entries get generated, it means that the QueryDBWithUserKey.asmx service is working as intended.
- The installation is now completed. All you need to do is to create the table in Microsoft SQL Server Management Studio.
3.4 Steps for Troubleshooting
DBXL installation will fail when ASP.NET and other web services required by DBXL in section 3.2.2 are not installed.
As a workaround, the following steps will enable all the required features in DBXL. To do this, you will need to run a script in the PowerShell window. These are the install commands for Windows Server 2012 R2/Windows Server 2016/Windows 10.
- On the Windows desktop, right-click Windows PowerShell on the taskbar, and then click Run as Administrator.
- Copy and paste the following commands and press Enter.
powershell
   Install-WindowsFeature Web-Server
   Install-WindowsFeature Web-WebServer
   Install-WindowsFeature Web-Common-Http
   Install-WindowsFeature Web-Default-Doc
   Install-WindowsFeature Web-Dir-Browsing
   Install-WindowsFeature Web-Http-Errors
   Install-WindowsFeature Web-Static-Content
   Install-WindowsFeature Web-Http-Redirect
   Install-WindowsFeature Web-Health
   Install-WindowsFeature Web-Http-Logging
   Install-WindowsFeature Web-Custom-Logging
   Install-WindowsFeature Web-Log-Libraries
   Install-WindowsFeature Web-Request-Monitor
   Install-WindowsFeature Web-Http-Tracing
   Install-WindowsFeature Web-Performance
   Install-WindowsFeature Web-Stat-Compression
   Install-WindowsFeature Web-Dyn-Compression
   Install-WindowsFeature Web-Security
   Install-WindowsFeature Web-Filtering
   Install-WindowsFeature Web-IP-Security
   Install-WindowsFeature Web-Url-Auth
   Install-WindowsFeature Web-Windows-Auth
   Install-WindowsFeature Web-App-Dev
   Install-WindowsFeature Web-Net-Ext
   Install-WindowsFeature Web-Net-Ext45
   Install-WindowsFeature Web-AppInit
   Install-WindowsFeature Web-Asp-Net
   Install-WindowsFeature Web-Asp-Net45
   Install-WindowsFeature Web-ISAPI-Ext
   Install-WindowsFeature Web-ISAPI-Filter
   Install-WindowsFeature Web-Mgmt-Tools
   Install-WindowsFeature Web-Mgmt-Console
   Install-WindowsFeature Web-Mgmt-Compat
   Install-WindowsFeature Web-Metabase
   Install-WindowsFeature Web-Lgcy-Mgmt-Console
   Install-WindowsFeature Web-Lgcy-Scripting
   Install-WindowsFeature Web-WMI
   Install-WindowsFeature Web-Scripting-Tools
   Install-WindowsFeature NET-Framework-Features
   Install-WindowsFeature NET-Framework-Core
   Install-WindowsFeature NET-Framework-45-Features
   Install-WindowsFeature NET-Framework-45-Core
   Install-WindowsFeature NET-Framework-45-ASPNET
   Install-WindowsFeature NET-WCF-Services45
   Install-WindowsFeature NET-WCF-TCP-PortSharing45
- Wait until all the Windows Features are finished installing:
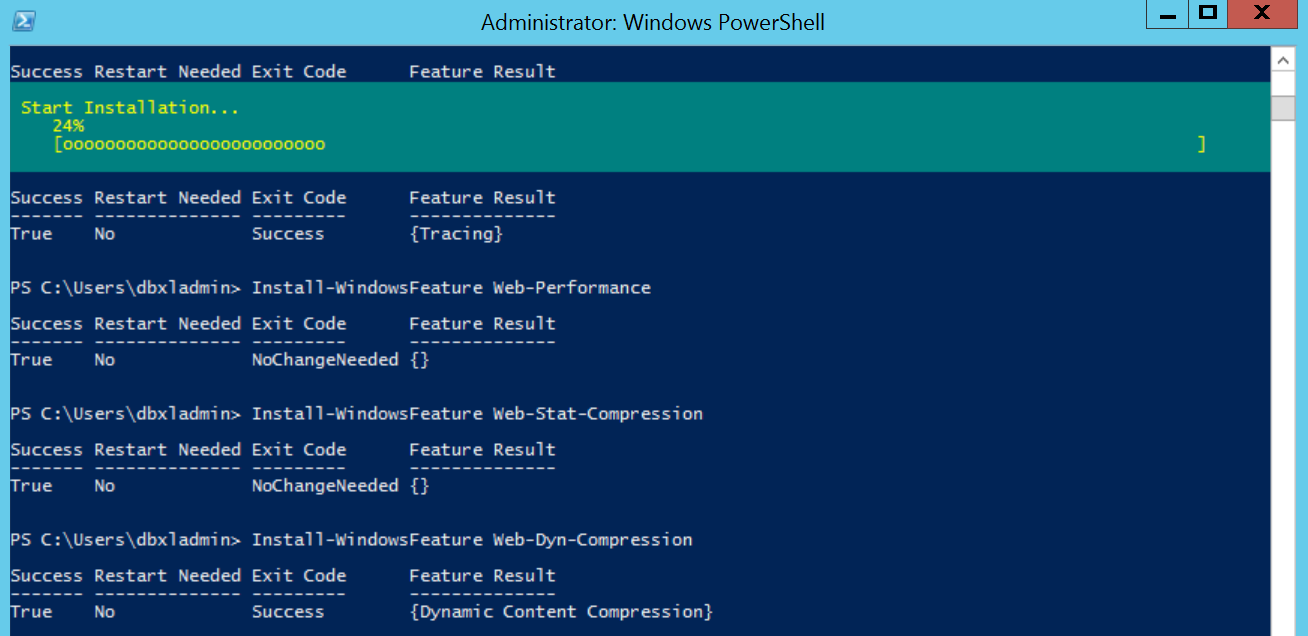
- When installation is finished, verify installation by opening the All Servers page in Server Manager, selecting a server on which you installed roles and features, and viewing the Roles and Features tile on the page for the selected server.
If you have encountered issues while installing DBXL, please contact Qdabra at [email protected]. For any other questions not covered in this document, please contact Qdabra Software.
For help, active customers can use the Customer Support Portal. For anything else, use Contact Us or e-mail [email protected].
3.5 Summary
- Create a Windows Server 2012 R2 Datacenter virtual machine (Standard tier, size A3) from the Azure gallery, attach an empty data disk, and add an HTTP endpoint on port 80.
- Connect with Remote Desktop, turn off IE Enhanced Security, and initialize and format the data disk as a GPT volume (e.g.
H:labeled DBXLData). - Install Web Server (IIS) with all role services except WebDAV Publishing, plus .NET Framework 3.5, then install SQL Server Express 2014 (named instance SQLEXPRESS) with its directories on the data drive.
- Set Default Web Site to Windows Authentication, run the DBXL setup as administrator, and configure the Site, Log On (Network Service), Document Security, Active Directory and SQL Server tabs.
- Configure
QueryDBWithUserKey.asmxfor anonymous access, generate a user key withDbxlKeyService.asmx> GetUserKey, and verify it with GetDropdownEntries. - If the installation fails because IIS or ASP.NET features are missing, run the
Install-WindowsFeaturescript in an elevated PowerShell window.