Chapter 1 - Installation
This chapter guides you through the installation of DBXL v3.6. It lists the server and client requirements, explains the choice between Windows and SQL Server Authentication for the database connection, walks through the installer tab by tab, and shows how to verify the installation afterwards. Before installing, please check the DBXL Deployment Guide in this folder to review the scenarios that apply to your environment.
Note: If you are upgrading from a previous version of DBXL, please contact Qdabra support.
1.1 Server requirements
DBXL requires Microsoft .NET Framework 4.6.2 or later (4.8 recommended) and Windows Server 2016 or later. To check which .NET Framework version is installed, see How to: Determine which .NET Framework versions are installed.
The server where DBXL will be installed needs to meet the following requirements.
1.1.1 Domain
- DBXL should only be installed on machines that are part of a domain. This can be verified in My Computer > Properties > Computer Name.
- If you choose to install DBXL on a machine that is not joined to a domain, some aspects of DBXL that deal with authentication (such as the Active Directory web service) will not work.
1.1.2 SQL
- DBXL is compatible with SQL Server 2017 or later, including Express edition. It is not compatible with the Windows Internal Database.
- Note that for all of DBXL's search methods to work, Full Text Search should be installed. If Full Text Search is not installed, DBXL will install (and log a warning in the eventvwr).
- Qdabra recommends that the user installing DBXL be granted sysadmin permission on SQL. However, there are two installation scenarios that should work without users needing the sysadmin role:
- SQL DBA pre-creates the databases and grants that user (who is installing DBXL)
db_owner. - User has
dbcreatorpermission.
1.1.3 SharePoint
- In the past, Qdabra Software recommended installing DBXL on the SharePoint - 80 site. This is no longer the default scenario.
- DBXL should be installed on a separate server. However, if a separate server is not available, DBXL can be installed on a separate site (on the SharePoint server).
- SharePoint is not required. DBXL supports SharePoint Server Subscription Edition and SharePoint Online (Microsoft 365).
1.1.4 IIS
DBXL requires IIS (Windows Server 2016 or later), configured to work with .NET Framework 4.6.2 or later.
Important: All IIS compatibility features must be installed. To do this, you will need to run a script in the PowerShell window.
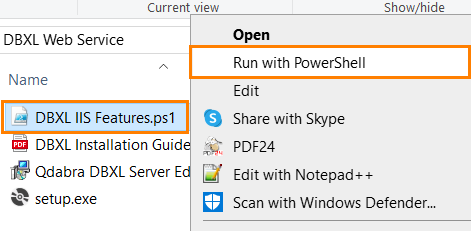
- Right click on
DBXL IIS Features.ps1(included in the DBXL installation package) and run with PowerShell.
- Make sure that PowerShell opens as Administrator. Wait until all the Windows Features are finished installing.
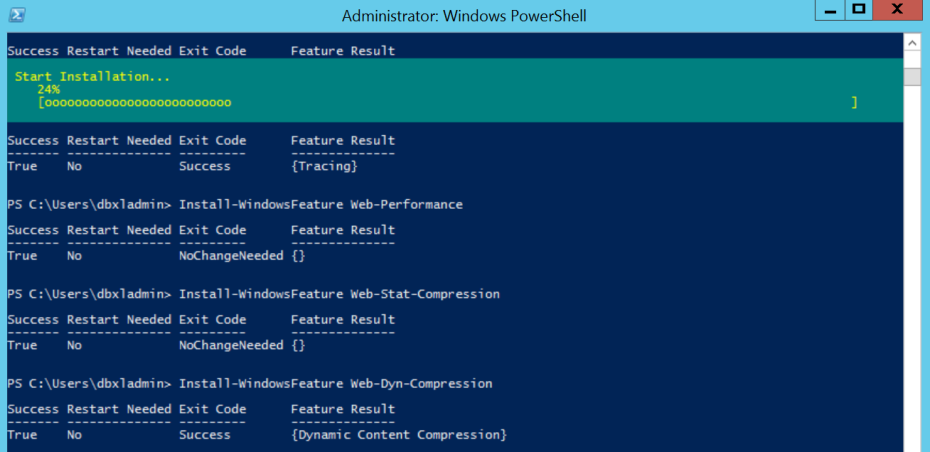
- For reference, these are the install commands for Windows Server 2012 R2/Windows Server 2016/Windows 10.
powershell
   Install-WindowsFeature Web-Server
   Install-WindowsFeature Web-WebServer
   Install-WindowsFeature Web-Common-Http
   Install-WindowsFeature Web-Default-Doc
   Install-WindowsFeature Web-Dir-Browsing
   Install-WindowsFeature Web-Http-Errors
   Install-WindowsFeature Web-Static-Content
   Install-WindowsFeature Web-Http-Redirect
   Install-WindowsFeature Web-Health
   Install-WindowsFeature Web-Http-Logging
   Install-WindowsFeature Web-Custom-Logging
   Install-WindowsFeature Web-Log-Libraries
   Install-WindowsFeature Web-Request-Monitor
   Install-WindowsFeature Web-Http-Tracing
   Install-WindowsFeature Web-Performance
   Install-WindowsFeature Web-Stat-Compression
   Install-WindowsFeature Web-Dyn-Compression
   Install-WindowsFeature Web-Security
   Install-WindowsFeature Web-Filtering
   Install-WindowsFeature Web-IP-Security
   Install-WindowsFeature Web-Url-Auth
   Install-WindowsFeature Web-Windows-Auth
   Install-WindowsFeature Web-App-Dev
   Install-WindowsFeature Web-Net-Ext
   Install-WindowsFeature Web-Net-Ext45
   Install-WindowsFeature Web-AppInit
   Install-WindowsFeature Web-Asp-Net
   Install-WindowsFeature Web-Asp-Net45
   Install-WindowsFeature Web-ISAPI-Ext
   Install-WindowsFeature Web-ISAPI-Filter
   Install-WindowsFeature Web-Mgmt-Tools
   Install-WindowsFeature Web-Mgmt-Console
   Install-WindowsFeature Web-Mgmt-Compat
   Install-WindowsFeature Web-Metabase
   Install-WindowsFeature Web-Lgcy-Mgmt-Console
   Install-WindowsFeature Web-Lgcy-Scripting
   Install-WindowsFeature Web-WMI
   Install-WindowsFeature Web-Scripting-Tools
   Install-WindowsFeature NET-Framework-Features
   Install-WindowsFeature NET-Framework-Core
   Install-WindowsFeature NET-Framework-45-Features
   Install-WindowsFeature NET-Framework-45-Core
   Install-WindowsFeature NET-Framework-45-ASPNET
   Install-WindowsFeature NET-WCF-Services45
   Install-WindowsFeature NET-WCF-TCP-PortSharing45
- When installation is finished, verify installation by opening the All Servers page in Server Manager, selecting a server on which you installed roles and features, and viewing the Roles and Features tile on the page for the selected server.
Further IIS requirements:
- The DBXL installer adds the DBXL App pool account to
WSS_WPG(when DBXL is installed on a SharePoint site) orIIS_WPG(when DBXL is installed on a non-SharePoint site). - When setting up the server, under Windows components application server, there is an option to allow ASP.Net applications. This needs to be installed in order for the software to install and run correctly.
- The DBXL installer grants
db_datareaderanddb_datawriterSQL permissions to the application pool identity. - Anonymous Authentication must be disabled on the site where DBXL is going to be installed; otherwise, the installer might fail.
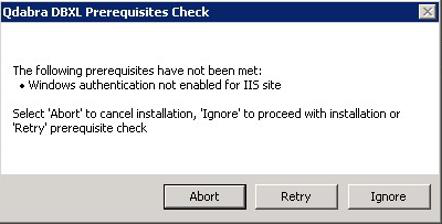
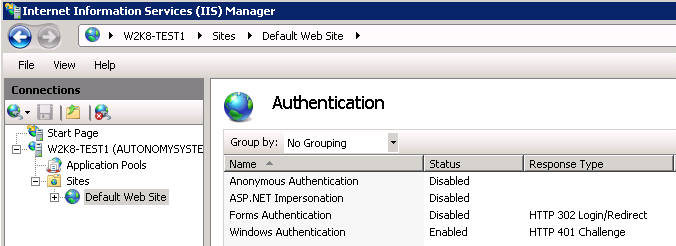
- Windows Authentication must be enabled on the site; otherwise the installer will stop with the following message. Once Windows Authentication is enabled, you may click Retry on the dialog box.
- DBXL requires Windows Server 2016 or later.
- The DBXL Installation will fail on sites that have the WebDAV Publishing IIS role installed. If WebDAV publishing shows as Installed, the DBXL installer will return a message such as the one shown in the screenshot below.
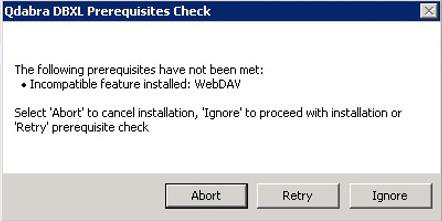
Note: Uninstalling WebDAV may require a server restart. If one is needed, you will need to click Abort in the dialog shown above, then restart the DBXL installer after the server restarts.
1.2 Client requirements
The client machine is the computer that will access the DBXL Administration Page and Web services.
- Permissions: Ability to authenticate with the server where DBXL will be installed.
- Browser: Microsoft Edge or Google Chrome.
1.3 Windows or SQL authentication?
DBXL may use either Windows Authentication or SQL Server Authentication to connect to the database specified by the installer. The connection string that DBXL uses to connect to the SQL Server is stored in the web.config file of the web service.
When using Windows Authentication, this connection string is left unencrypted since it does not contain password information. The DBXL service account will be added to the db_datareader and db_datawriter roles for the DBXL databases during installation. The user account used to run the DBXL installation must be a sysadmin of the SQL Server instance.
If using a local account (e.g. Network Service) and a remote SQL instance, the machine account (e.g. <Domain>\<Machine>$) is added to the db_datareader and db_datawriter role.
For SQL Server Authentication the connection string is encrypted to prevent unauthorized users from obtaining the password information. In addition, when using SQL Authentication, the SQL account specified must have database creation permission during the installation process. Once installed, the only permissions required are membership in db_datareader and db_datawriter roles.
| SQL Authentication | Windows Authentication | |
|---|---|---|
| Local SQL Server | Connection string is encrypted. SQL and Web Service users are separate. | Connection string is not encrypted. SQL and Web Service users are the same. |
| Remote SQL Server | Same as Local SQL Server. Connection string for QueryDB connections must be declared (unencrypted) in web.config. |
Connection string is not encrypted. User <Domain>\<Machine>$ is added to the remote SQL Server as a db_owner. |
Independent of the authentication method chosen, the user specified for connecting to the SQL Server is added to the QdabraDBXL and QdabraUtility databases in the db_datareader and db_datawriter roles.
1.4 Installation step by step
This section contains step-by-step instructions for the installation of DBXL.
1.4.1 Create the site
This section is only required if following the Event Receiver scenario.
On the server where DBXL will be installed, a new site will be needed (if one does not exist already). Qdabra Software recommends installing DBXL on a standalone IIS web site that does not host SharePoint.
- Create a new IIS site that uses Windows Authentication. Anonymous Authentication must be disabled.
- Check permissions on the site's new folder and compare these to the permissions on the
wwwrootfolder. Add any missing permissions. - Check the firewall to ensure outside users can communicate with the site.
Note: Please make sure that your server has .NET Framework 4.6.2 or later installed (4.8 recommended).
1.4.2 Start the installer
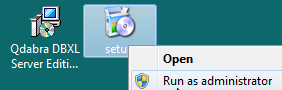
- Right click on
setup.exeand select Run as Administrator.
- Click Next in the Welcome screen.
- After reviewing the End User License Agreement, select I Agree and click Next.
1.4.3 Installation address
- In the Installation Address screen, you will find a dropdown listing all sites. Select the desired Site for installation from the dropdown.
- Note that all sites (even sites that are stopped) are listed in this screen. Make sure to select the correct site for installation.
- Use IIS Manager to check the available sites to confirm that the correct site is being selected and that the site is not stopped.
- The Virtual Directory is set to
QdabraWebServiceby default, but this can be changed if desired. - Click Next, and in the Confirm Installation screen, click Next again.
You will see a bar indicating the progress of the installation. Once completed, you will see a screen with various tabs. The following sections describe each tab.
1.4.4 Site tab
The Site tab allows you to select the site URL.
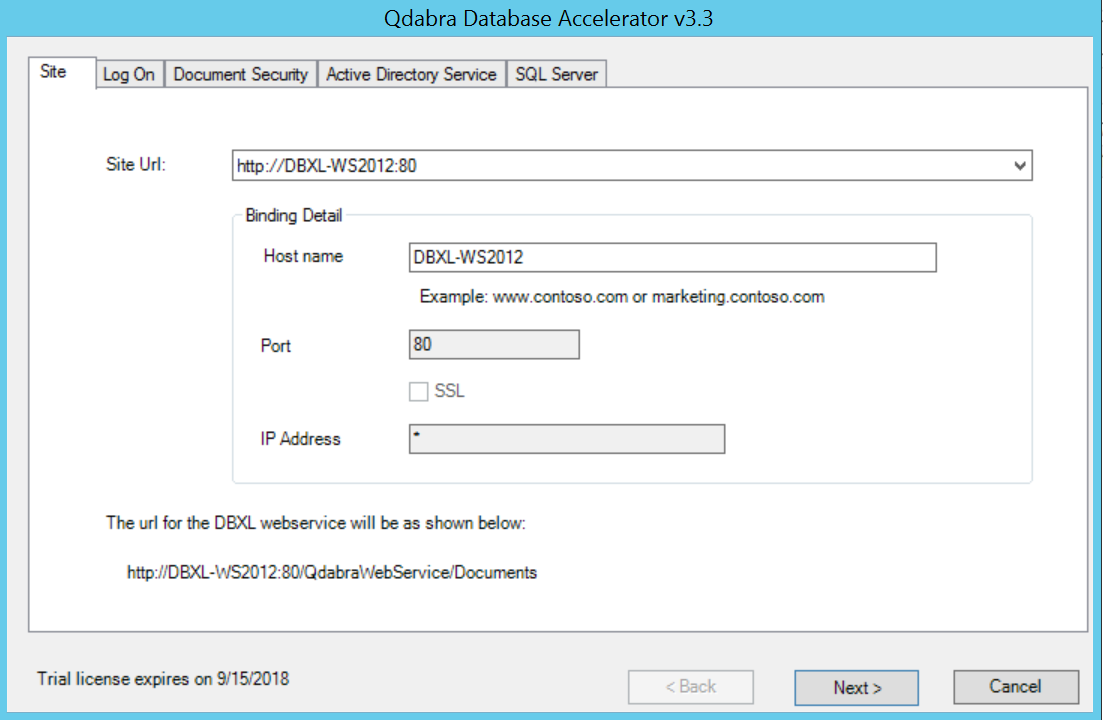
- From the Site Url dropdown, select the desired site.
- The Site Url dropdown will show a list of combinations of SSL and host headers defined in IIS.
- If you select one of the options that does not use the machine name, the Binding Detail section will be disabled.
- If you select one of the options that uses the machine name, the Binding Detail section will allow you to override the host header to be something not specified in IIS.
- If the site is using an alias, you will need to specify it in the host header field during installation.
- When installing DBXL in some environments, the default Site Url will be SSL. Do not select the HTTPS site unless you have configured a certificate.
- If the site will be accessed via HTTPS, you will need to configure the website for SSL before installing DBXL.
- If a fully qualified domain name is being used, that value should be entered in the hostname field during installation.
- This tab will also show you the expiration date for the trial license. If you notice that the trial license has expired, please download the most recent version from Qdabra.com or contact [email protected].
- Click Next to proceed to the following tab.
1.4.5 Log On tab
The Log On tab allows you to indicate the account which DBXL will run as.
-
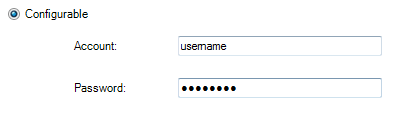
Select between Predefined and Configurable account credentials.
- If you select Predefined, you will not need to provide credentials.
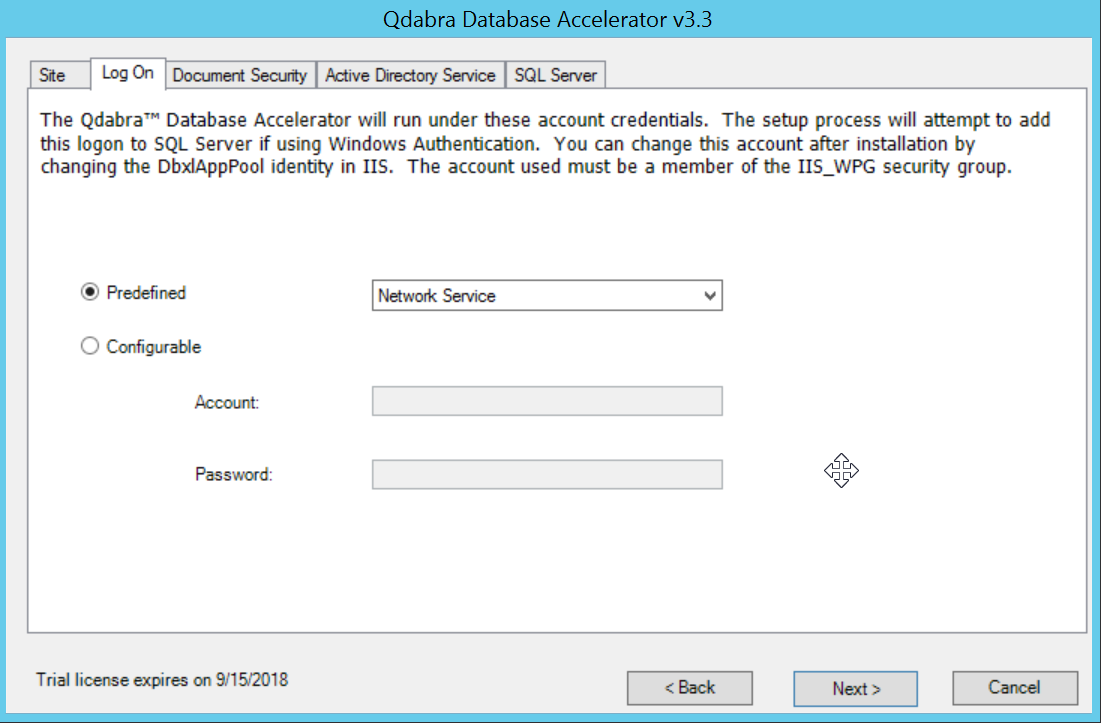
- If you select Configurable, you must provide an Account and Password.
-
Click Next to proceed to the following tab.
1.4.6 Document Security tab
In the Document Security tab you can set up permissions for DBXL. The DBXL installer automatically creates a local group called DbxlAdmins. You can add users to the DbxlAdmins group after installation has completed; the members of this group will be able to manage licenses, add document types, and manage access permissions to DBXL document types.
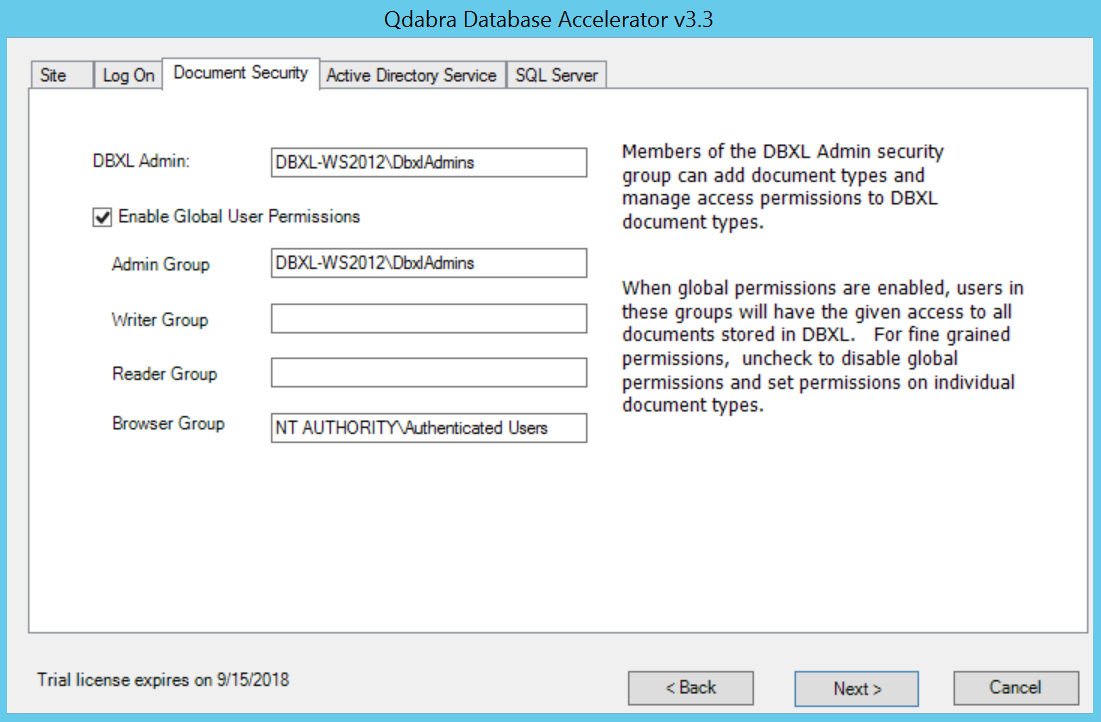
If you want to use your own group, make sure that you (the user installing DBXL) have been added to the group.
This screen has other options, such as the Enable Global User Permissions checkbox. If you uncheck Enable Global User Permissions, you will have to set permissions on every individual document type, since the Global Permissions will not be enforced. Disabling global permissions does not make DBXL "wide-open". On the contrary, it restricts access to DBXL.
- Click Next to proceed to the following tab.
1.4.7 Active Directory Service tab
The Active Directory Service is used to obtain username and other Active Directory Information. In the LDAP Path textbox, the default value is populated from the system when a domain controller can be contacted.
-
If the domain controller cannot be contacted, you'll need to manually enter the LDAP Path (for example:
LDAP://DC=DomainName,DC=com).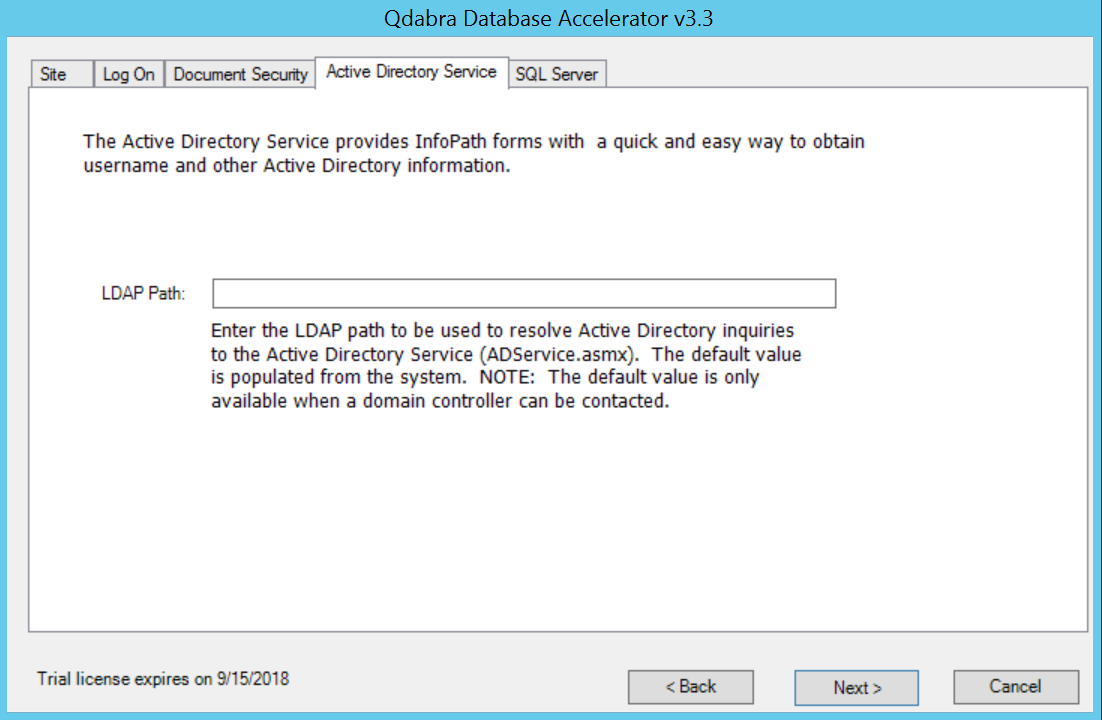
-
Click on Next to go to the following tab.
1.4.8 SQL Server tab
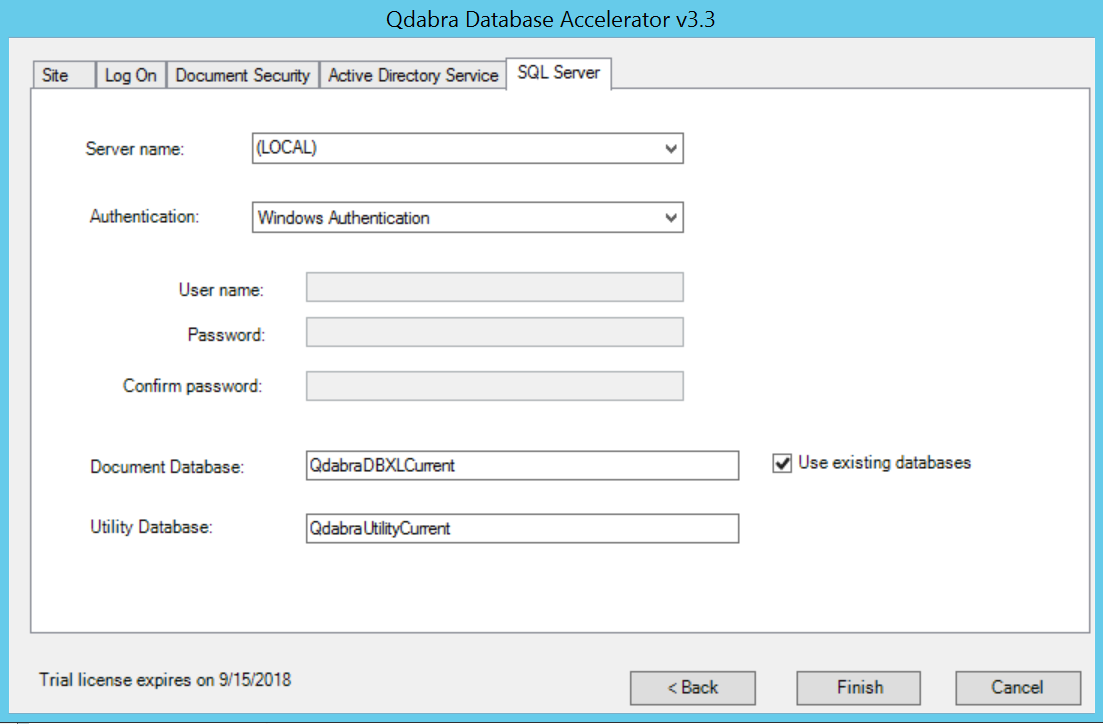
In the SQL Server tab, indicate the database where DBXL will store its data.
- Select the SQL Server name. The dropdown will list all local SQL instances that were detected by the installer. For example, in the case of a SQL Express installation on the same machine, this will be
(LOCAL)\SQLEXPRESS. You may still type in the name of a remote SQL instance, if desired, or if the installer fails to list the correct SQL instance. -
Select the Authentication type used to access the SQL server from the dropdown.
- If you select Windows Authentication, no credentials will be necessary. The account of the user installing DBXL will be used to connect and create the database and thus requires sysadmin permission. The account used for the DBXL application pool will be granted
db_datareaderanddb_datawriterpermission during setup. - If you select SQL Server Authentication, fill out the User name, Password and Confirm password fields. The SQL account is used to create the database, and thus Qdabra recommends granting sysadmin rights. Once the database is created and installation has completed, the user rights can be reduced to
db_datareaderanddb_datawriterroles.
- If you select Windows Authentication, no credentials will be necessary. The account of the user installing DBXL will be used to connect and create the database and thus requires sysadmin permission. The account used for the DBXL application pool will be granted
-
Enter the Database where DBXL documents will be stored.
Installation of DBXL will fail and produce an error message when the database name entered contains a space. By default, the database names are QdabraDBXL and QdabraUtility. You may change these, but you must use database names that do not contain spaces.
This tab contains one more option, Use existing databases. You only need to use this if you had a previous installation and want to reuse the same databases.
1.4.9 Finish the installer
- Click on Finish to complete the installation.
You will see another bar, called Configuration Status, indicating the progress of the installer. This status will change as the installation executes. When it finishes, click Close in the Installation Complete screen. Internet Explorer will open showing default.htm, from where you can access the Forms, Documents and Web service descriptions. We recommend adding a bookmark to this page (default.htm).
1.5 Post installation
1.5.1 Verify your installation: Event Viewer
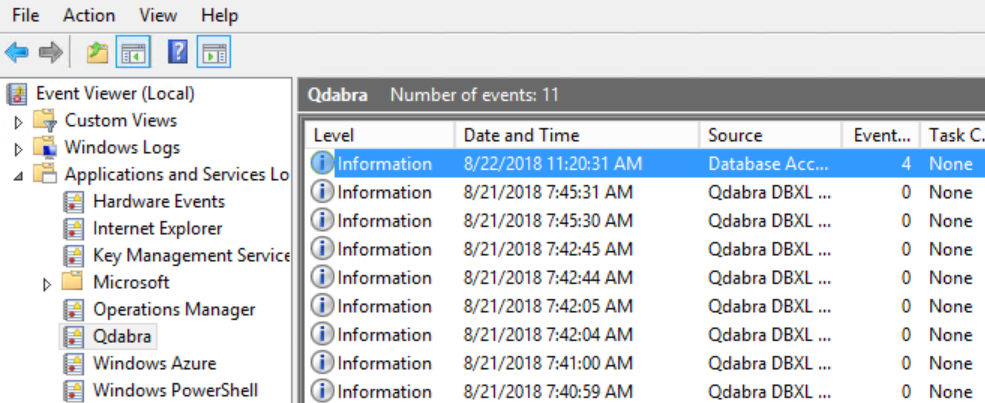
Please check the server's Event Viewer, and specifically the event log named Qdabra, to identify whether any error occurred during installation. You can configure the server to send a DBXL Administrator email whenever an error is recorded in this event log. For information, see Configuring Email Notifications for Qdabra Eventlog Entries.
1.5.2 DBXL Administration Tool
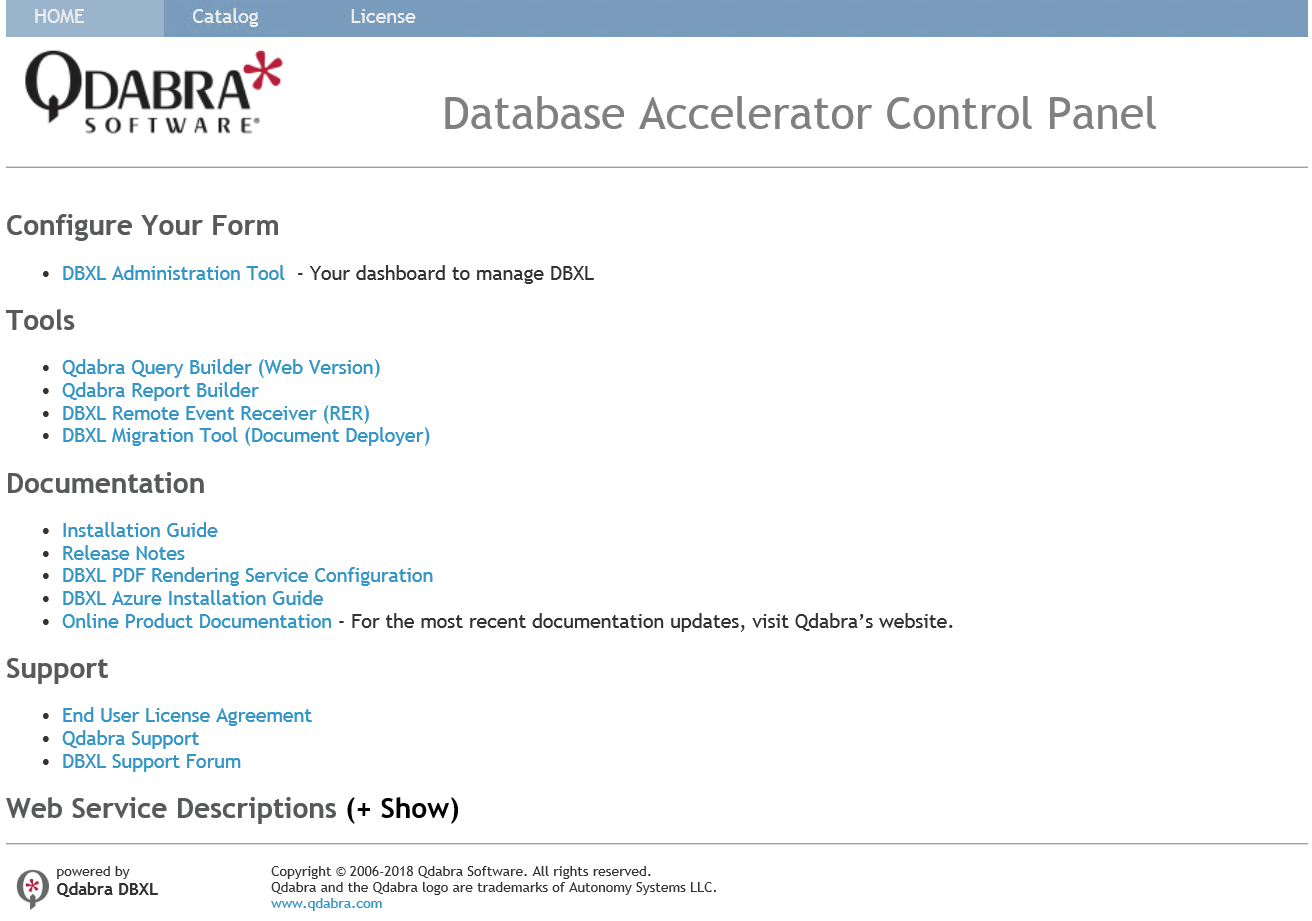
The DBXL Administration Tool, also known as DAT, is automatically set up during installation. You can verify that DAT was set up correctly by following these steps:
- Open the default page:
http://<servername>/QdabraWebService/default.htm. The servername will depend on the URL where DBXL was installed (from the Site tab during installation). - Click on the DBXL Administration Tool link.
1.6 Support
If you have encountered issues while installing DBXL, please contact Qdabra at [email protected].
If DBXL has been successfully installed, try out the Getting Started document, which is linked from DBXL's default.htm page.
For any other questions not covered in this document, please contact Qdabra Software.
For help, active customers can use the Customer Support Portal. For anything else, use Contact Us or e-mail [email protected].
1.7 Summary
- You checked the server requirements: domain membership, a supported SQL Server, SharePoint placement, IIS with .NET Framework 4.6.2 or later, and the IIS features installed by
DBXL IIS Features.ps1. - You chose between Windows Authentication and SQL Server Authentication for the database connection and saw how each affects the connection string and SQL roles.
- You created an IIS site with Windows Authentication enabled and Anonymous Authentication disabled.
- You ran
setup.exeand completed the Site, Log On, Document Security, Active Directory Service and SQL Server tabs. - You verified the installation in the Qdabra event log and opened the DBXL Administration Tool from
default.htm.